Hello everyone. I was honored to be chosen to make this years TOMB knife for auction in Atlanta at Blade. For those of you who do not know TOMB is "The Order of the Mystic Brotherhood", a small fraternal organization within the ABS, that provides help to the ABS and ABS members.
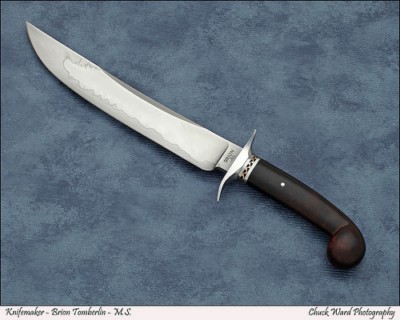
I have chosen a style of knife that I am known for, that being the persian fighter. The knife has an upswept blade, usually with a hamon, and another Japanese touch, being the swedge on the spine.
This is an example. Kind of a mix, but I like it. The blade is modeled after a Japanese style of tanto called cormorants neck, after the shape of the spine as seen from the top. The knife that I am making will have an eight and a half inch blade of W-2 from some guy in New Jersey. The guard will be 416 stainless in a fighter style, and a three piece spacer in 416 and silicon bronze. The handle will be premium ironwood. The handle style has yet to be determined.
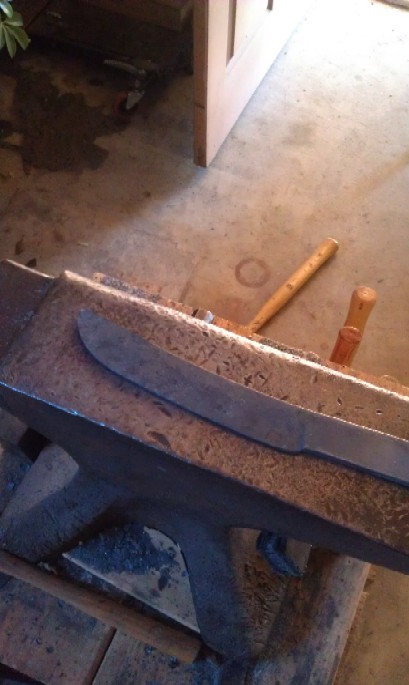
So now on the work. This first picture is the blade in the middle of forging. Nothing real exciting.
The basic shape has been forged and I am getting ready to go for the tang. I am going to concentrate more on the steps after forging, like polishing after heat treat and then the handle and guard.
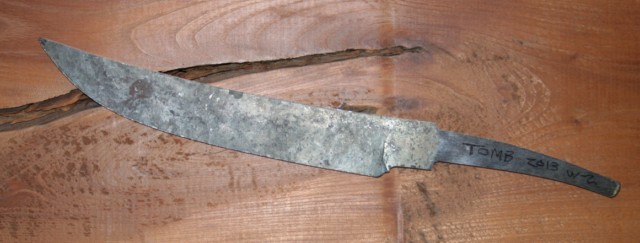
This next picture is the blade after forging and thermal cycling. It has been annealed and profiled and is ready for the rough grinding. I will grind to 120 grit before heat treating and then apply the satanite to the clean blade.
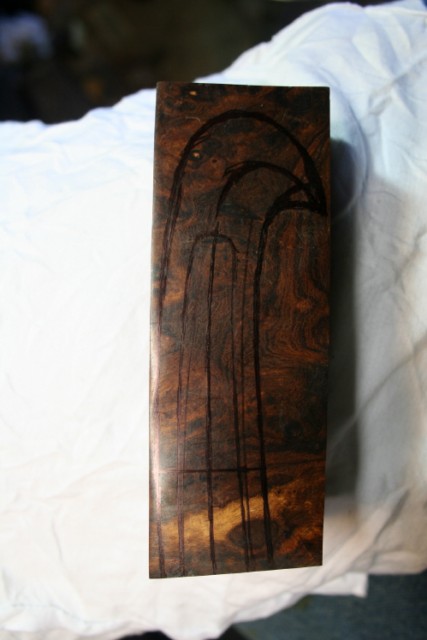
By the way the background is a really large chunk of Bois D'arc.
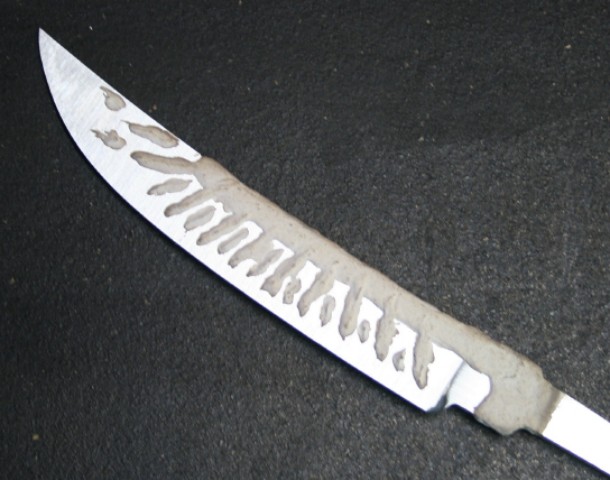
Here is the blade at 120 with the satanite applied. The thickness of the satanite is slightly over 1/16". What I am hoping for with this style of application is a hamon pattern called choji. It was and is very popular in the Bizen tradition of swordmaking. It is also known as clove blossom. We will see. This is the last picture for right now.
More to come. The next installment will deal with the swedge and layout for that. Also how I grind it and get it even.
Brion
Brion Tomberlin
Anvil Top Custom Knives
ABS Mastersmith
Wow that is such a great looking knife and you do such awesome work! That hamon is a very neat design you are going for, I am looking forward to seeing the finished product. Keep up the good work and keep us posted!
Evan
Awesome Brion,
Congrats on being picked for this honor.
Cant wait to see the rest of this WIP.
Greg
Great WIP Brian. I appreciate the work involved as well as the skills shared , Thanks. PauL
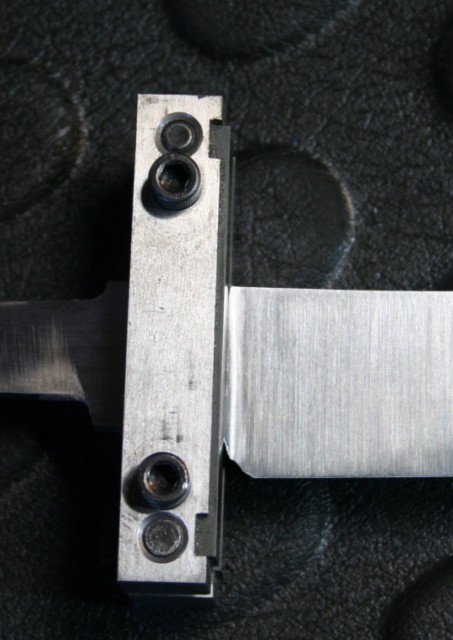
Okay on to the next steps. I try to get the plunge cuts very close to final shape before heat treating the blade. Saves work in the future. However you do need to clean up usually after heat treating. I use a fileguide from Uncle Al at Riverside machine. It has carbide faces, which means you can use it on the grinder. Belts do not touch carbide. Yes it is expensive, but well worth the money. Every knife shop needs a file guide, I have three of them. The carbide gets used to most.
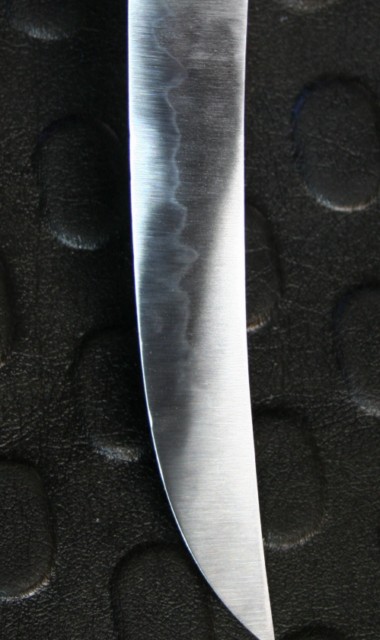
Here it is attached to the blade, ready for light grinding. By the way the blade is showing a hamon after grinding with a A65 trizact belt, the eqivalent of a 280 grit.
It also appears that utsuri will be visible. This is a shadow hamon or ghost hamon above the main hamon line. The hamon is close to choji. Just have to see when it is time for polishing.
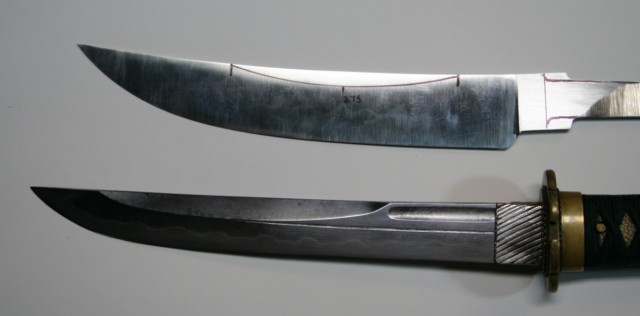
The blade has been taken to the previous A65 finish and I am going to layout the swedge. Here is a picture of the blade next to an original unokubi zukuri or cormorant neck tanto from the late 1600's.
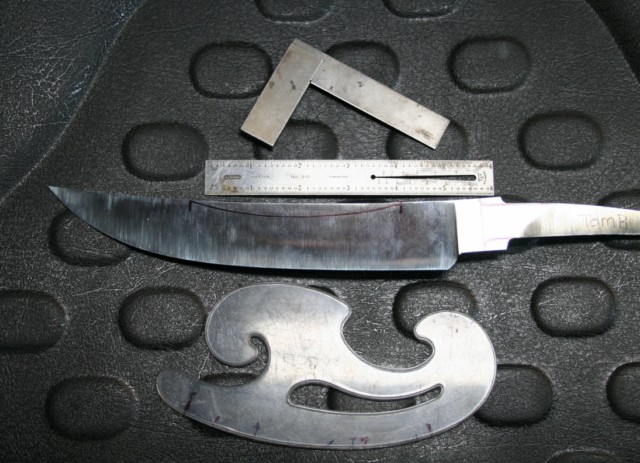
This swedge is what I am laying out. Here is the blade with layout tools.
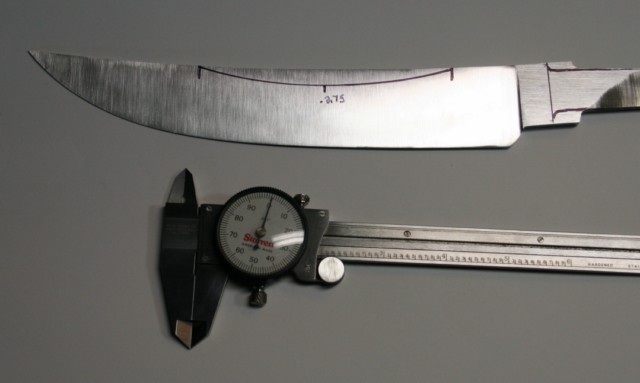
You will notice a french curve in there. They usually come in a set of three and I believe they are essential for a knifemaker. You would not believe how many things you can do with them. Everything from laying out clips to handles. I also included a machinists rule, think accuracy, and a machinists square, again accuracy. The square is essential for laying out ricassos. Another indespensible tool is a set of dial calipers. Even a less expensive set will allow you to get very close tolerances. I use them on every knife I make and could not live without them.
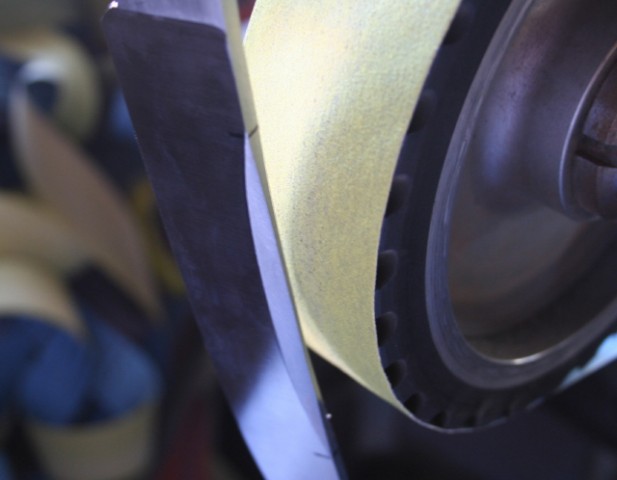
You will notice the line for the swedge layed out using the french curve. Also notice layout marks on the blade, marking end points. There is also a layout mark in the middle on both sides with the depth of the swedge, in this case .275 inches. I will use the grinder for the roughing in. I use a fresh 120 grit belt and the eight inch contact wheel. This is where a variable speed grinder comes in handy as I go slow and take my time. The blade is held vertical to the wheel and ground very carefully. I will try to get a picture of this for the next update. The next one will also show tools used in cleaning up the swedge and getting shoulders taken care of. Then comes the fun part, hand finishing.
Stay tuned
Brion
Brion Tomberlin
Anvil Top Custom Knives
ABS Mastersmith
Here is an update on the persian. I have ground the swedge on both sides. Very carefully and slowly on the grinder, running a slow speed.
I am running the blade vertical to the wheel. Then I clean up with files, draw filing and regular filing. I also use diamond files for the hardened portions.
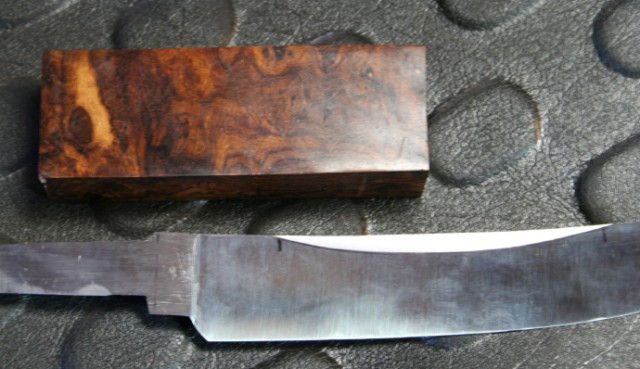
Does not look too bad. The handle block is some really nice ironwood for the handle. If anyone has questions, feel free to ask. The next one will deal with hand finishing and polishing.
Brion
Brion Tomberlin
Anvil Top Custom Knives
ABS Mastersmith
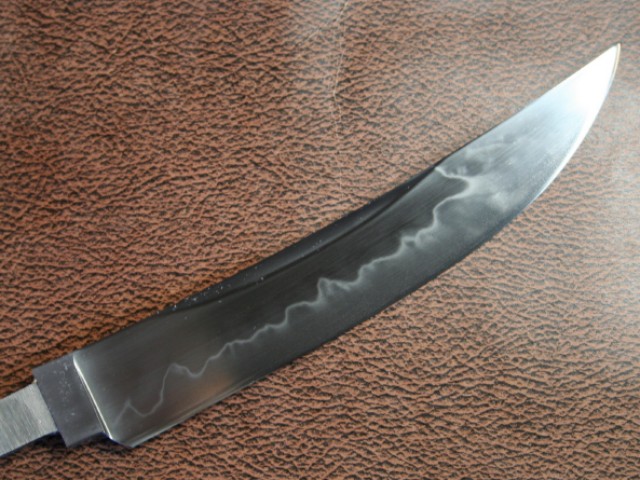
The saga continues and I am running short on time. The blade is polished and looking good. There is ashi below the hamon and utsuri or ghost hamon above. The hamon is close to choji.
I hand rubbed the blade to 1200 grit, starting at 220. Think of the 220 stage as foundation polishing, making sure all lines are even and the blade is flat. Here is a little tip for the plunge areas.
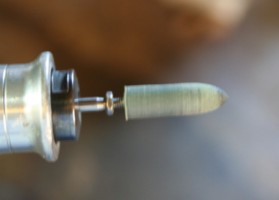
This a foredom tool, dremel will work as well. The attachment is a cratex point. RioGrande sells a kit of these in different grits. These cratex points can be shaped with sandpaper to whatever shape you need. These work real well in cleaning up plunges.
The blade was etched for three 10-15 second cycles in ferric chloride. Four parts water to one part ferric. After each etch the blade was cleaned of oxide build up with auto body rubbing paste, approximately 1500 grit. The third cycle was the same including the clean up. Then I began the polish with simichrome polish, then pumice stone mixed with oil applied with a soft tissue. I continue these steps until I get the look I want. In this case it took me about four hours of work. I forgot to mention, make sure the blade is grease free before etching, CLEAN. I use dawn dishwashing detergent and not sparingly.
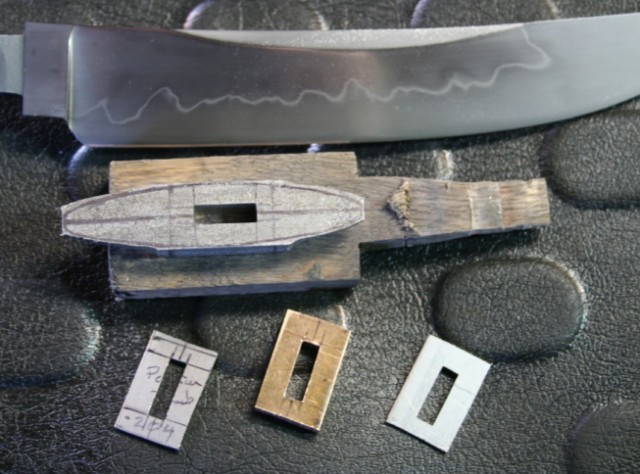
So now the blade is good, on to the guard. This will be a four piece guard set up, the main guard and three spacers. Here are the pieces and a shop made tool for holding the guard while smoothing out curves and shaping. Just a piece of scrap wood to fit in the guard slot.
The guard slot was milled out to .205, the width of the tang just back of the ricasso. This leaves me with a small cleanup of the slot and a press fit of guard to ricasso. The spacers were also milled out at this time.
The guard is a fighter or double branch guard and the guard will be an S shape. This involves heating with a torch and applying gentle taps with a brass hammer. That takes place after the main shaping. One thing to do is to use layout lines for guard shape, spacer shape, etc. Just makes things much easier. I normally use a sharpie to cover the surface and then scribe the lines with a carbide scribe.
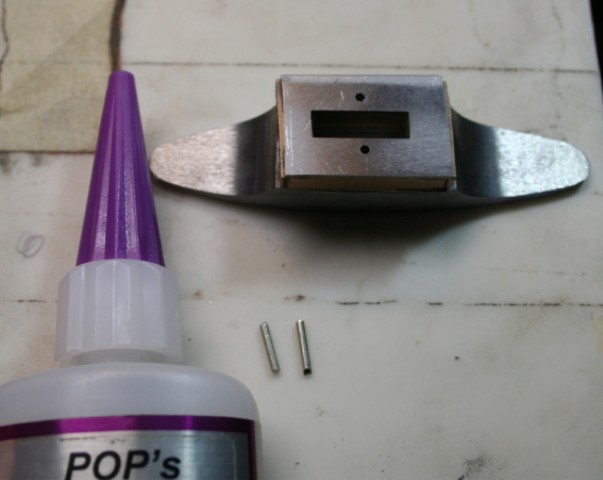
This is very important. With a four piece set like this you have to use alignment pins and superglue. The superglue allows you to glue up pieces for fitting or drilling alignment holes and then take them back apart. A little heat and the glue comes apart. I would say the 80% of my knives have alignment pins. These insure that the pieces always go back together in the same position. I also mark each piece with a mark so that I can tell which one goes where in the set. Example would be using a small nail set with a ground point to mark one dot for the first one, two dots for the second, and three for the third. Usually on the side that faces the guard.
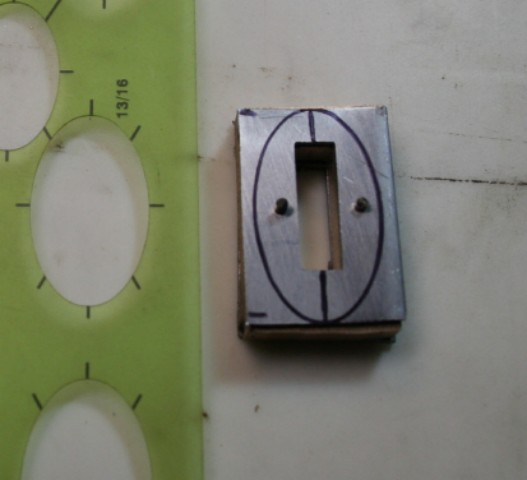
One final picture for tonight. This involves laying out your spacer shape. I use an ellipse template. I have three of them with different sizes. You could also use a drawing program and print out ellipses that you could superglue to the piece. This shot also shows the alignment pin holes, which are 1/16". I am using mickel silver for the pins, just what I have. Another important point. The surfaces of these pieces must be flat in order to mate up correctly. This means no unsightly gaps between spacers. I use a granite surface plate with sandpaper to make sure.
As of right now the guard has been shaped and bent. The face has been finished and the back side has been shaped to match the spacers. It is now fitted on the blade and sealed with JB weld. JB weld just acts as a selant not a gap filler. This guard had to be pressured on with a guard jig. I just want to keep any moisture or anything else out.
The next chapter will deal with handle fitting and shaping and final cleanup to finished knife.
Thank you all.
Brion
Brion Tomberlin
Anvil Top Custom Knives
ABS Mastersmith
Great hamon Brion!!
Thanks for doing this WIP. I know these are a lot of work.
Outstanding work Brion!
Thanks for taking the additional time and effort to do a Work in Progress for everyone to learn techniques from.
Dan Cassidy
Journeyman Smith
Send an email to Dan

This is turning out to be really cool! I love seeing your process.
Thanks for sharing all this with us Brion! I don't get why you have to individualize the pins. How are they different from one another and why?
Thank you all for the encouragement. Tomorrow will be a full day and we should have a finished knife by the end. Phil I am not sure what you mean by individualized pins. I think I could have phrased it better in regard to the pins and spacer pieces. The spacer pieces are individually marked to ensure they assemble in the correct order every time. The pins are just 1/16" stock made long enough to go through all spacers and into the guard. Because sure enough if I did not mark the pieces, I would spend five minutes sometime trying to figure out why they don't fit right. Just call it eliminating possible issues. I know I have zipped past some steps, sorry about that. The guard and handle process is something you really have to watch in person and learn, like in a handles and guards class.
Thanks again.
Brion
Brion Tomberlin
Anvil Top Custom Knives
ABS Mastersmith
Thanks Brion. I misread your description, thinking you said you marked each pin. I guess my brain is getting more tired as the years go by. Even when I had gone back to reread your description I had reread it wrong again. Marking the pieces, of course, makes sense.
So here we are at the final chapter of this WIP. Previously we saw the finished blade and guard pieces, so now it is on the the finishing of the guard and spacer. The guard was rough shaped with a small wheel attachment on the bader, 3/4" diameter for getting the curves and transitions in. Then for final shaping the foredom tool was used. This is a very handy tool to have in that it is variable speed and reversible, plus there are so many burrs, discs, etc. for it. A Dremel will work just as well. RioGrande Jewelry Supply has tons of things for them. Here is one indespensible thing I use.
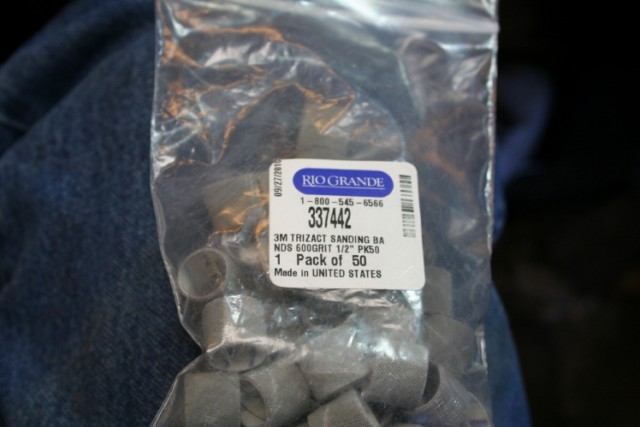
These are getting hard to find, so I bought a bunch of them. They are trizact sanding drums and come in grits from 220 up to 600 and in 1/4" and 1/2" sizes. Same as the trizact belts. Great for getting in small areas. These were used to do final shaping on the guards curved areas in order to get a good match up between guard and spacer. Here you can see what I am talking about.
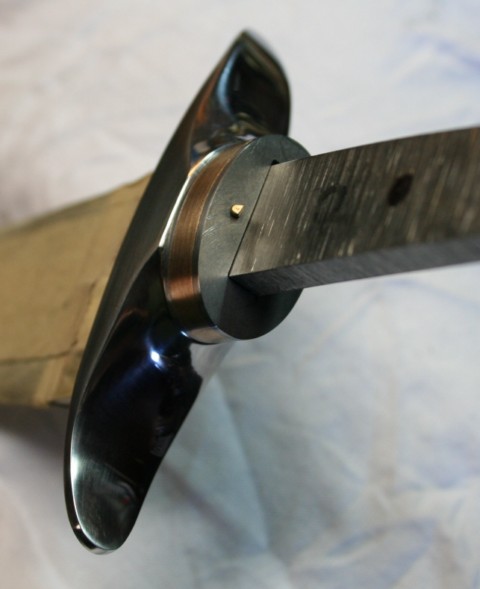
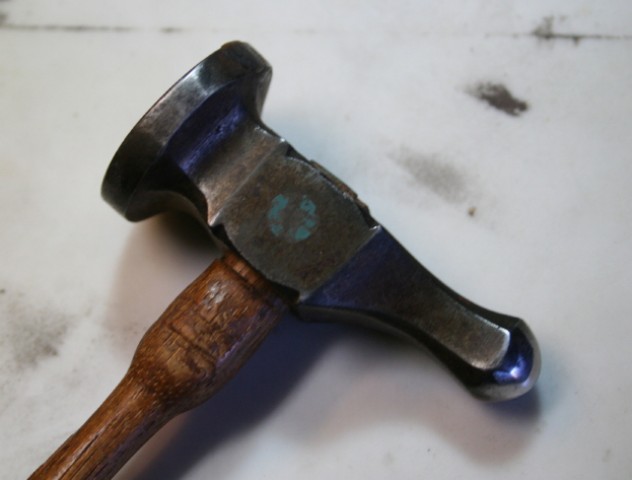
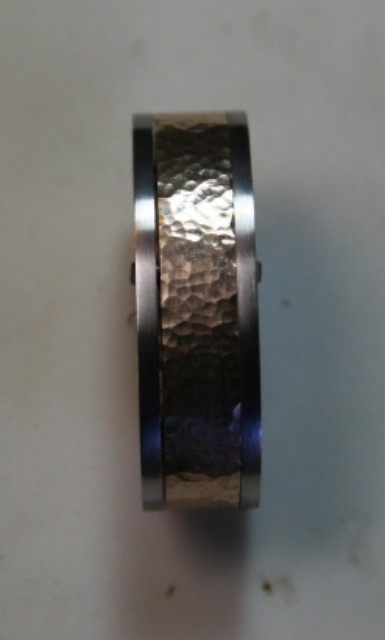
A nice transition between guard and spacer. This is after about an hour and a half of hand rubbing on the guard, from 220 up to 1500, then polishing. Next up is the spacer finishing. It was shaped to the layout lines and then hand finished to 1500 grit and polished with a white scotchbrite strip. The equivalent of 2000 grit. After the polishing I had to decide what decoration to use on the middle bronze spacer. I could have left it plain, but it looks better with something. I decided to do a hammer peened finish on it, to contrast with the stainless outer spacers. Some of you may be wondering, why did he use a bronze spacer instead of another stainless one. Well it provides a connection to the color of the ironwood, it is also a piece to draw the eye. Yes stainless would have been fine also. Just a design element. Here is the tool used to do the finish.
One thing to note, after you do the hammer finish, you must again flatten the faces of the spacer in order for it to fit well with the two outer spacers. The surface plate to the rescue. Here is the finished spacer assembly.
So the guard and spacers are done and fit well. On to the handle. First this is a hidden tang handle. Which means you must open up a slot for the tang to fit into in the block of ironwood. First comes layout.
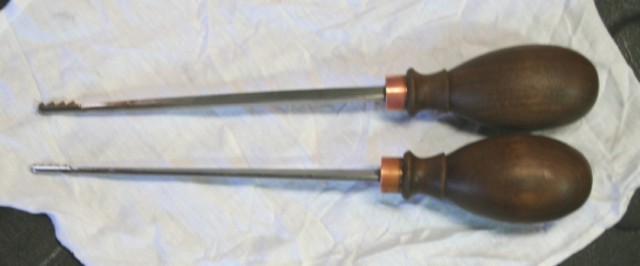
You can see the layout lines on the block with the roughed in handle shape. The tang is traced to get the outline. Then a pair of holes are drilled into the block to the correct depth. Then we connect the holes and enlarge the slot to accept the tang. A couple of really handy tools for that job.
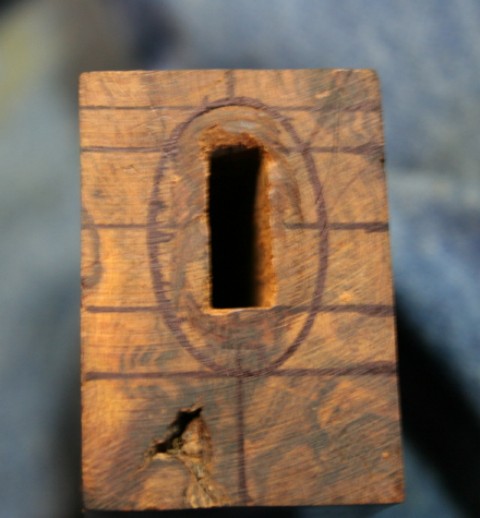
These were made by John Perry MS and are handle broaches. I could not live without them. Kind of nice looking too. Here is a picture of the slot opened up and fitted for the tang.
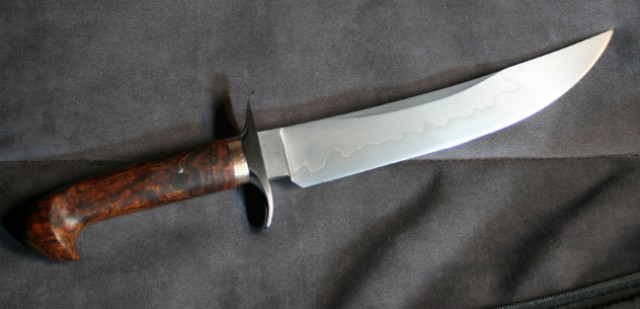
One thing to notice in this shot is the void in the ironwood at the bottom left. This caused an issue later on, also caused blue air in the shop, and resulted in flying handle piece. Ironwood is beautiful handle material, but it clogs up drill bits, files, and other tools. It also can have voids in it. For the most part they are very small and can be taken care of with superglue. However you can find a larger one when you least expect it. That is what happened in this case. Got down to final shaping with a file and a large void showed. Scratch one handle and start over again. So I did. The next block was much nicer. After getting the slot to the correct size, I used the bandsaw to cut close to the lines. I then drilled the hole for the pin. The handle is still basically square when I do this. The handle was also drilled in the tang at this time. Then the handle was rough shaped on the grinder with a 60 grit belt. Then refining the shape with a fresh 120 J flex belt, using the platen and slack belt. After that was accomplished, it was on the hand filing to even out everything. I did leave the handle slightly proud of the spacer where they meet to allow for any wood movement depending on climate. After the filing was done, it went back to the grinder for a final slack belt grinding at 400 grit with another J flex belt. Then on to hand finishing. I usually go up to 1500 grit then use the white scotchbrite again. The handle was then glued up and the pin installed. After letting it setup, I peened the handle pins and smoothed them. Then the whole handle assembly was coated with paste wax and polished. So it is finally done and I must say it looks really nice. I chose to do a persian style handle in what is called a birds head style. You will notice the flow of the knife. The blade has an upsweep to it while the handle sweeps slightly down. A nice shallow S curve. Very few straight lines. This adds to the look I was going for. The knife balances right in fornt of the guard.
Thank you all for the interest and your comments. The knife will be at the Little Rock show this weekend and then at Blade for the auction. Again thank you and thanks to TOMB for choosing me to do this project.
Brion
Brion Tomberlin
Anvil Top Custom Knives
ABS Mastersmith
Thank you Brion for not only sharing your expertise in this well written Work in Progress but also for building and donating your outstanding work to the 2013 ABS Atlanta Knife Auction as the "2013 Tomb Knife of the Year".
Dan Cassidy
Journeyman Smith
Send an email to Dan


