
Ever wonder how one keeps a 36"+ grind line straight? Well here is my solution. When I started out in knifemaking I would attend the shows and could spot the stock removal blades instantly by how straight, clean and precisely they were shaped. I always thought how great it would be to make a forged blade with the same crispness. But bladesmiths take that perfectly flat and clean bar of steel that stock removers get to work with and beat the snot out of it, leaving it hammered, all scaled up and with tapers already forged into it. Then I started looking at the flat square area in front of the guard and saw possibilities in the ricasso. After a little tinkering I worked out a way to use it in scribing centerlines using the old layout table favorites the height gauge and surface plate.
It all worked great for knives, but swords posed a few more problems. One needed a really big surface plate and then you need to overcome gravity pulling on a 36+ inch tapered forging. Then one day I found this baby:
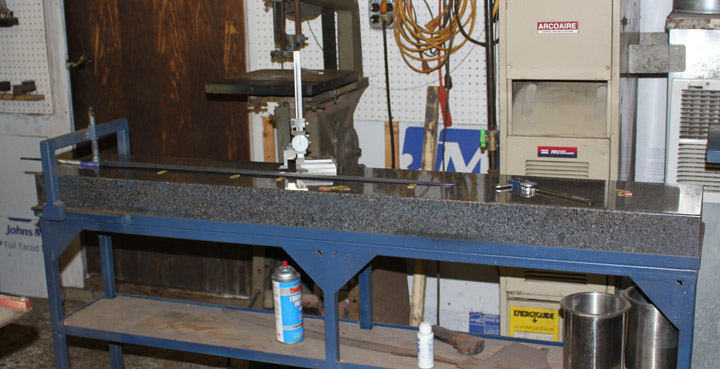
I was so happy when I brought this home but my family simply said “OK, so you have a 5 foot slab of granite.†I built a stand sturdy enough to hold it, with leveling units on the bottom, and a movable screw hold down. After the ricasso is entirely trued up, the edges of the forging are cleaned up and layout dye applied to them. The next part of this system is on my lab computer in the shop. I built an Excel spread sheet into which all I have to do is input the exact thickness of the ricasso in .000†and the thickness I want my edge before heat treatment. The program instantly produces the two settings I will need to set the height gauge to and the exact points on the blade under which I need to place a series of metal shims, that I made just for that purpose, to bring the centerline of the blades cross section up on a plane that is dead level with the top of the surface plate. Then the holding screw is tightened down on the ricasso and all I have to do is slide the preset height gauge along the length of the blade, reset it to the second number and repeat. I will then have two perfectly straight lines to grind to at the edge of the sword. But this is one reason why I am such a critic of overheating steel on the grinder, if you get crazy and warp the blade, your nice straight lines are warped as well.
Anyhow, I used to sit at that surface plate for a long time with a calculator, forgetting and retyping numbers, but then I looked at that spread sheet on my computer and wanted to kick myself for not wising up a long time ago.
"One test is worth 1000 'expert' opinions" Riehle Testing Machines Co.
|quoted:
Ever wonder how one keeps a 36"+ grind line straight? Well here is my solution. When I started out in knifemaking I would attend the shows and could spot the stock removal blades instantly by how straight, clean and precisely they were shaped. I always thought how great it would be to make a forged blade with the same crispness. But bladesmiths take that perfectly flat and clean bar of steel that stock removers get to work with and beat the snot out of it, leaving it hammered, all scaled up and with tapers already forged into it. Then I started looking at the flat square area in front of the guard and saw possibilities in the ricasso. After a little tinkering I worked out a way to use it in scribing centerlines using the old layout table favorites the height gauge and surface plate.
It all worked great for knives, but swords posed a few more problems. One needed a really big surface plate and then you need to overcome gravity pulling on a 36+ inch tapered forging. Then one day I found this baby:
I was so happy when I brought this home but my family simply said “OK, so you have a 5 foot slab of granite.†I built a stand sturdy enough to hold it, with leveling units on the bottom, and a movable screw hold down. After the ricasso is entirely trued up, the edges of the forging are cleaned up and layout dye applied to them. The next part of this system is on my lab computer in the shop. I built an Excel spread sheet into which all I have to do is input the exact thickness of the ricasso in .000†and the thickness I want my edge before heat treatment. The program instantly produces the two settings I will need to set the height gauge to and the exact points on the blade under which I need to place a series of metal shims, that I made just for that purpose, to bring the centerline of the blades cross section up on a plane that is dead level with the top of the surface plate. Then the holding screw is tightened down on the ricasso and all I have to do is slide the preset height gauge along the length of the blade, reset it to the second number and repeat. I will then have two perfectly straight lines to grind to at the edge of the sword. But this is one reason why I am such a critic of overheating steel on the grinder, if you get crazy and warp the blade, your nice straight lines are warped as well.
Anyhow, I used to sit at that surface plate for a long time with a calculator, forgetting and retyping numbers, but then I looked at that spread sheet on my computer and wanted to kick myself for not wising up a long time ago.
Thanks for sharing this method, Kevin! This has been something I've been thinking of for a long time. I know the post is a few months old, but how do you keep the edges straight and on the same plane when you're making a blade doesn't have a ricasso, like the vast majority of swords that existed before the Renaissance? Also, what would be the best way to do this if one did not have access to a five foot slab of granite?
Thanks!
