Well, I finally got this to the point where I decided to make this thing. I would like to go through the building process, like a WIP.
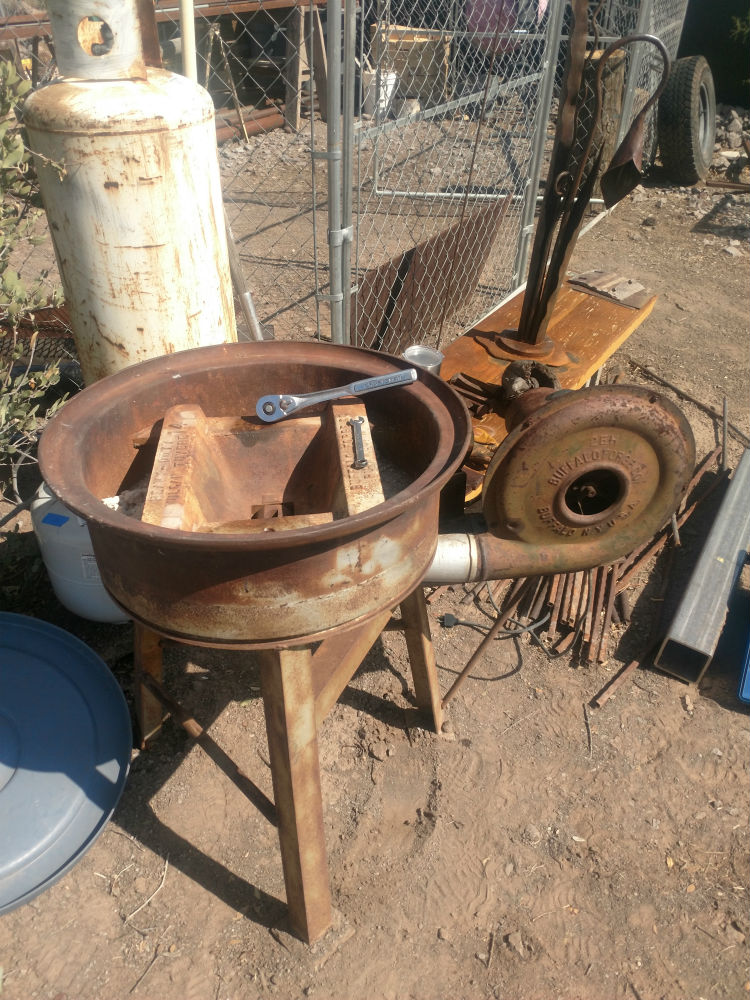
I traded a HF anvil for this rusty old wheel rim forge a few years back. It was packed with some sort of white clay that eroded away over the last few years. The fire pot looked solid and the blower needed a little work, but the set-up wasn't what I wanted.
I wanted more of a table type where extra coal could be readily available and I wanted it mobile.
So, I started dismantling it. The bolts that held it together were rusted so bad, it took a little MAPP gas torch and a half can of WD-40 to get most of them to come apart.
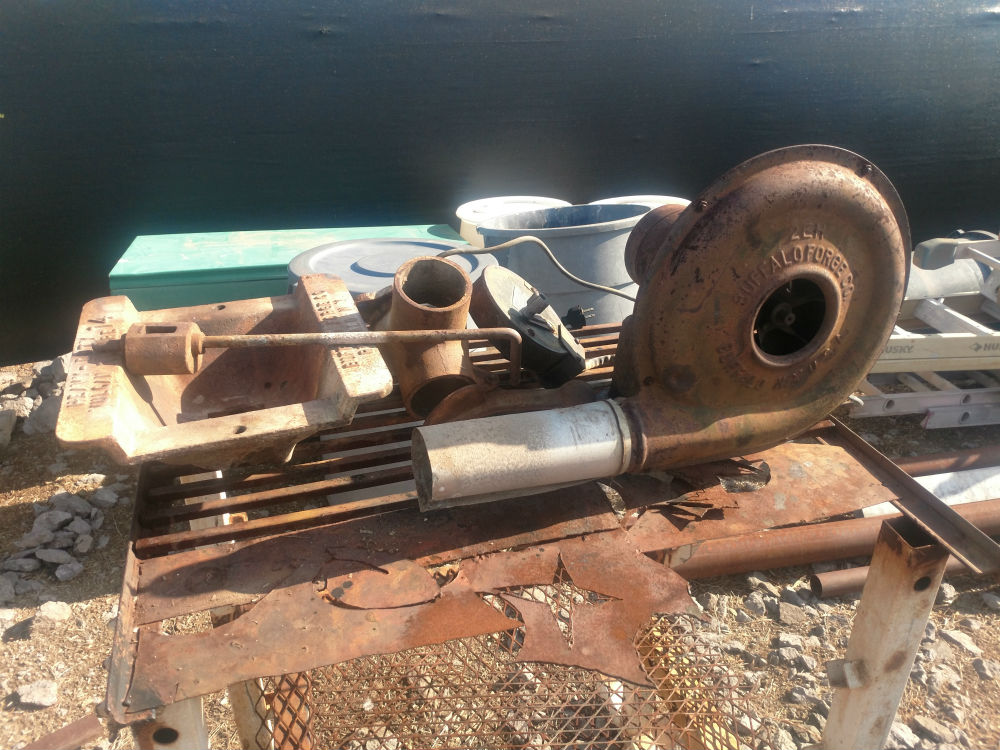
Some were so bad and unreachable so the fire-wrench (oxy-acetylene torch) was put to use. The pieces parts.
Now to raid the wife's steel yard for frame materials...….
Joshua States
www.dosgatosforge.com
https://www.youtube.com/channel/UCdJMFMqnbLYqv965xd64vYg
https://www.facebook.com/dos.gatos.71
Also on Instagram and Facebook as J.States Bladesmith
“So I'm lightin' out for the territory, ahead of the scared and the weak and the mean spirited, because Aunt Sally is fixin’ to adopt me and civilize me, and I can't stand it. I've been there before.â€
I love a good coal forge!!! Its my preferred method.
I like having control of what I get hot.
I know alot of people don't like coal forge's because you have to tend the fire (constantly feed the fire with more coke that you made from raw coal and having to clean clinkers out of the fire pot).
I look forward to seeing it finished.
Jason
Want to see more of my work follow me on Instagram:JasonVolkertKnives
Want to get in touch with me [email="JasonVolkertKnives@gmail.com"]Email[/email] me.
Jason: I have only used a coal forge once and that was only marginal use at best. I was one of two guys tending the forge for a demonstrator at one of our blacksmith association meets. Lucky me that the other guy knew what to do. (I volunteered to learn how).
On with the build
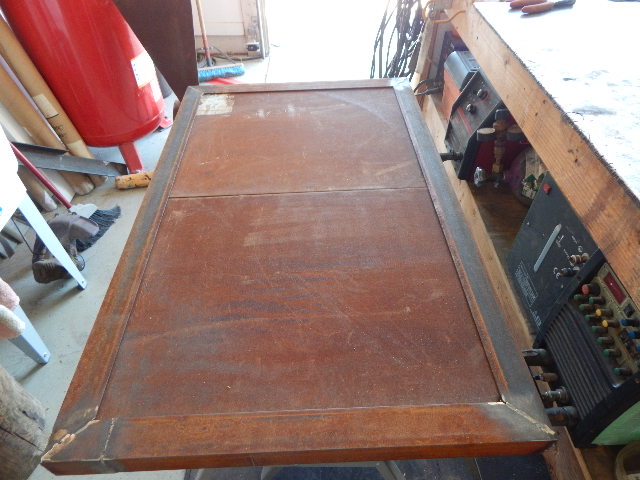
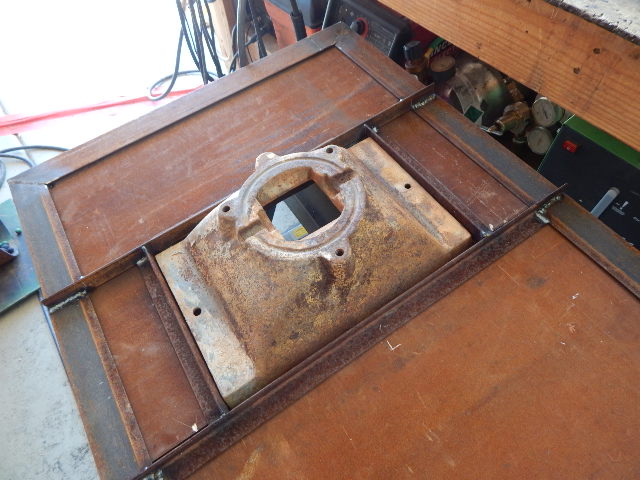
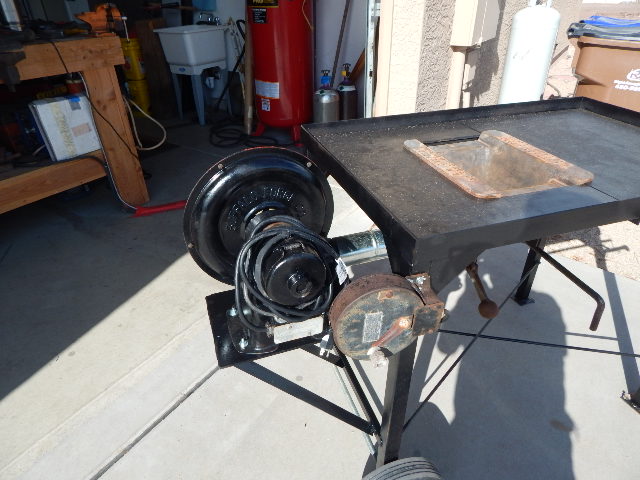
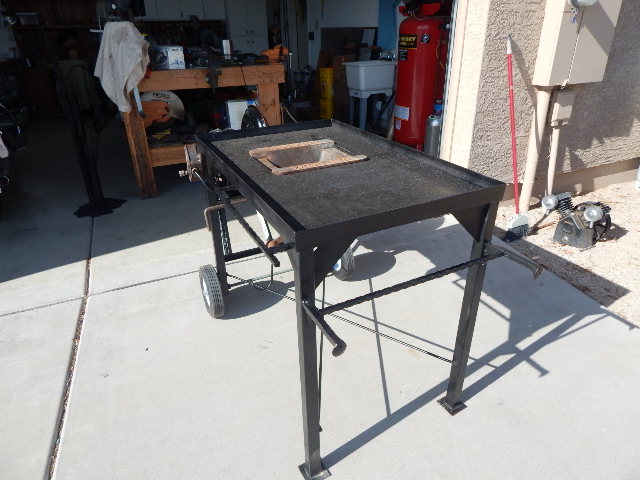
For the table I have a piece of 1/4" sheet. Well, two pieces actually. The piece I could get was 49" long and 19" wide, so I cut it in half and can make the table about 25' x 39".
Then, I cut some 2x2 x1/8" angle iron and built a frame.
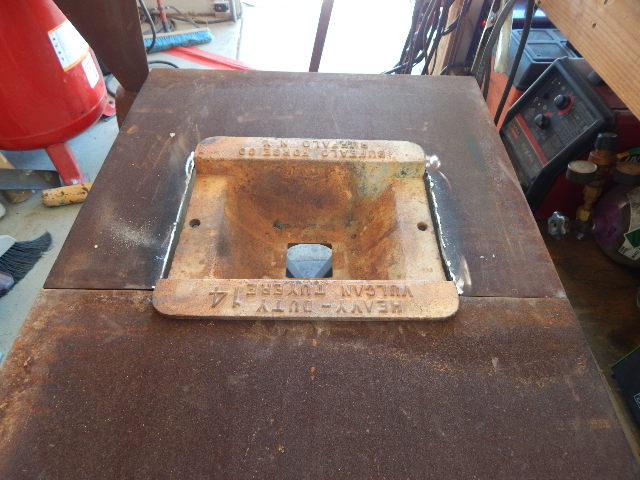
Cut out a hole in one of the two pieces for the firepot.
As you can see, I put the lower sides of the firepot so they flushed out with the surface of the 1/4" plate. There's a little gap there.
I used some 1x1x1/8" angles for the fire pot support and to close the gaps between the table bottom and the firepot.
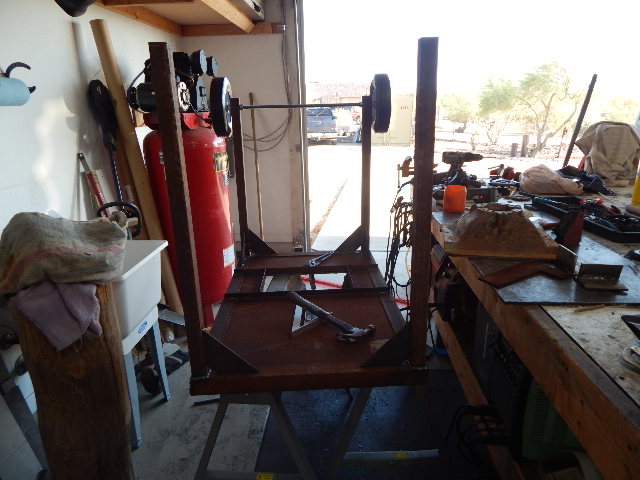
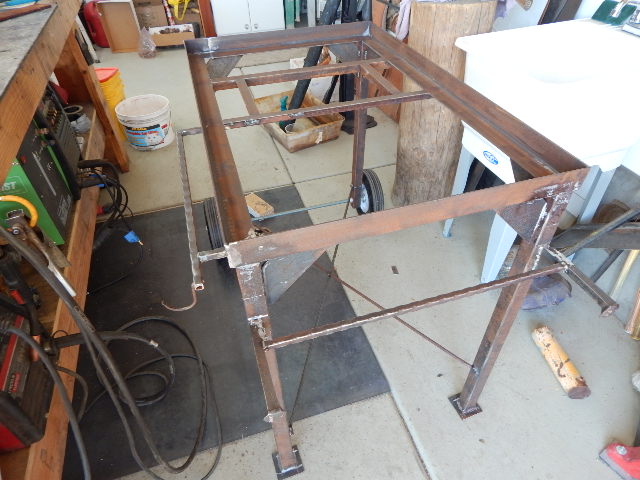
Now some 2x2 square tube for the legs and some 3/16" by 4 " flat plate for the leg gussets. I also added a couple of hand truck wheels and some 5/8" threaded rod for the axle.
Some cross ties to take the twisting motion away, a couple of tool racks and two railroad spike for handles.
Here it is after wire wheeling most of the rust off.
Now , it off to have a look at that blower.
Joshua States
www.dosgatosforge.com
https://www.youtube.com/channel/UCdJMFMqnbLYqv965xd64vYg
https://www.facebook.com/dos.gatos.71
Also on Instagram and Facebook as J.States Bladesmith
“So I'm lightin' out for the territory, ahead of the scared and the weak and the mean spirited, because Aunt Sally is fixin’ to adopt me and civilize me, and I can't stand it. I've been there before.â€
lol cool story Joshua. You will be a master at it after a couple of forging sessions. Word of advise if i may, I can't tell if that blower is electric or hand crank? If it is electric I highly recommend putting a air gate of some sort between the blower and the fire pot. I say that because it is real easy not to pay attention for a sec and the blower wide open and all of a sudden your blade looks like the 4th of July lol. Ask me how I know <img src=' http://www.americanbladesmith.com/ipboard/public/style_emoticons//blink.gi f' class='bbc_emoticon' alt=':blink:' /> <img src=' http://www.americanbladesmith.com/ipboard/public/style_emoticons//dry.gi f' class='bbc_emoticon' alt='<_<' /> . Anyway it is looking awesome. I love the railroad spike handles.
Want to see more of my work follow me on Instagram:JasonVolkertKnives
Want to get in touch with me [email="JasonVolkertKnives@gmail.com"]Email[/email] me.
|quoted:
lol cool story Joshua. You will be a master at it after a couple of forging sessions. Word of advise if i may, I can't tell if that blower is electric or hand crank? If it is electric I highly recommend putting a air gate of some sort between the blower and the fire pot. I say that because it is real easy not to pay attention for a sec and the blower wide open and all of a sudden your blade looks like the 4th of July lol. Ask me how I know <img src=' http://www.americanbladesmith.com/ipboard/public/style_emoticons//blink.gi f' class='bbc_emoticon' alt=':blink:' /> <img src=' http://www.americanbladesmith.com/ipboard/public/style_emoticons//dry.gi f' class='bbc_emoticon' alt='<_<' /> . Anyway it is looking awesome. I love the railroad spike handles.
A word of advice is always welcomed by me no matter who it comes from. I am capable of learning from anyone!
Thanks for that, but wait until you see what I have!
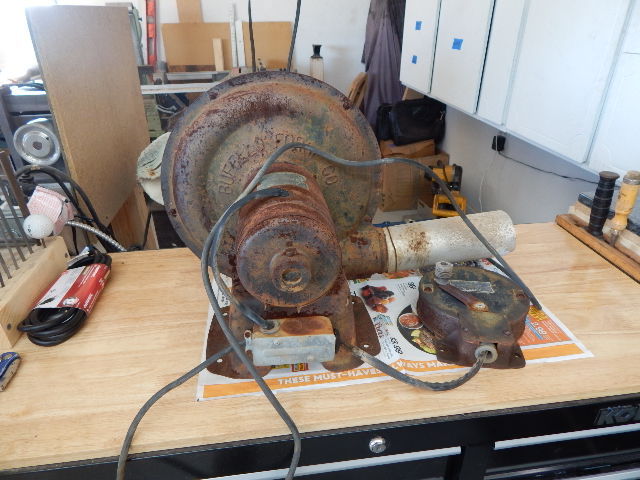
Here is the blower before rehab.
Yes, that's an original rheostat speed controller. I managed to get the fan and r-stat opened up, but I could only get minimum access to the motor. I got everything cleaned and lubed and replaced all the cordage (except from the motor to the J-box) and powered it up. Works like a charm. I took that plate cutout for the fire pot and welded a few supports to the frame. Then I got some 3" duct and fit it all together.
The Rheostat goes from "Off" to full in a smooth sweep, so it is capable of very small adjustments.
So that's where it sits today. I am planning on adding a side-draft hood on the short side of the table so it can be used indoors with a suitable exhaust duct out of the building.
If anyone has any other suggestions, I am all ears.
Next week, I may even fire this up. It's been hotter than hades around here lately and none of the forges have been running for about 4 months now. (moving the shop and household took the better part of 6 weeks)
Hey! After how many years on this forum and I finally figured out how to increase the font size so it is easily legible! (see? I can learn)
Joshua States
www.dosgatosforge.com
https://www.youtube.com/channel/UCdJMFMqnbLYqv965xd64vYg
https://www.facebook.com/dos.gatos.71
Also on Instagram and Facebook as J.States Bladesmith
“So I'm lightin' out for the territory, ahead of the scared and the weak and the mean spirited, because Aunt Sally is fixin’ to adopt me and civilize me, and I can't stand it. I've been there before.â€
Good stuff Joshua. All I have to say is WOW!!!!!!!
I think that is the best looking portable forge I have ever seen.
Jason
Want to see more of my work follow me on Instagram:JasonVolkertKnives
Want to get in touch with me [email="JasonVolkertKnives@gmail.com"]Email[/email] me.
Great work! I like it a lot, have a gas forge and want to make a coal forge, you inspired me to get going on it. Thank you for sharing Joshua.
That turned out real nice Joshua. I have to build a fixed forge soon and have similar components standing ready to go except mine will be a hand cranked blower. I have electricity in the appropriate area in case I change to electric. I plan to build my forge bed similarly and surround it with brick.
I want to build expansion and contraction into the cut out where the fire pot rests. And I want to have a pass through at table level for longer rods etc. I may have to cut the angle iron rim down for that and reinforce the bottom a bit. If the forge sits on top of the brick or a brick ledge, it can slip during expanding without cracking the brick.
|quoted:
That turned out real nice Joshua. I have to build a fixed forge soon and have similar components standing ready to go except mine will be a hand cranked blower. I have electricity in the appropriate area in case I change to electric. I plan to build my forge bed similarly and surround it with brick.
I want to build expansion and contraction into the cut out where the fire pot rests. And I want to have a pass through at table level for longer rods etc. I may have to cut the angle iron rim down for that and reinforce the bottom a bit. If the forge sits on top of the brick or a brick ledge, it can slip during expanding without cracking the brick.
Thanks for that Lin. I hadn't considered expansion of the fire pot in my design/construction. I will have to go back and make sure I left a bit of room for that. I also am considering cutting the side rail down, or at least notching it, for handles or longer pieces to slide through. I figure a 1" notch should be ample and a 6" long piece of angle under the notch (w/3" either side) should provide the support. I'll post new pics when I get the hood complete.
If I had the time, I'd offer to come out and help with that brick forge. I certainly have the mason skills and working on that with you would be stellar! Please post some WIP photos of the build.
Joshua States
www.dosgatosforge.com
https://www.youtube.com/channel/UCdJMFMqnbLYqv965xd64vYg
https://www.facebook.com/dos.gatos.71
Also on Instagram and Facebook as J.States Bladesmith
“So I'm lightin' out for the territory, ahead of the scared and the weak and the mean spirited, because Aunt Sally is fixin’ to adopt me and civilize me, and I can't stand it. I've been there before.â€
Looks quite nice, good job. I appreciate seeing how other folks handle things.

