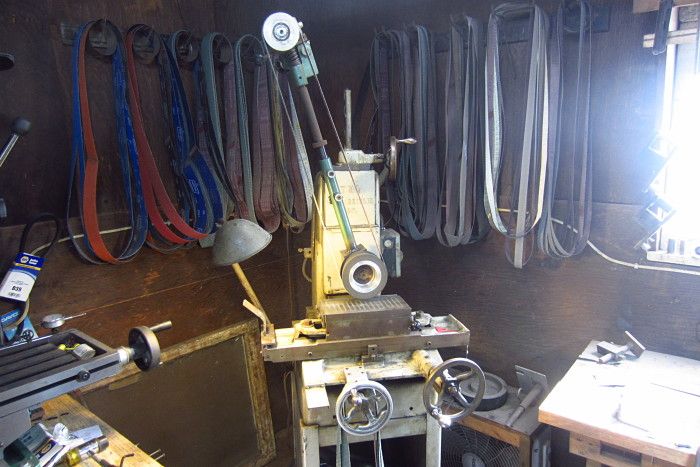
I'm looking to change my surface grinder to a belt! I have heard of this being done, but haven't seen the set up.
Does anyone have experience with converting a machine over to a belt? What size wheels did you use? How was the tension idler set up?
Any ideas would be very much appreciated!
Russell
I used the tooling arm from a Grizzly grinder.
Had the wheel cnc machined using a 95 durometer rubber coating on a hub that was perfectly matched to the housing and arbor of the surface grinder.
I had this made by Sunray Inc.
It is not an easy task.
Steps need to be taken precisely and accurately.
But I now use this grinder on virtually every knife.
I got the 220V, 3 ph. surface grinder on Craigslist for $250.00.
I have more than that in the retro fit.

Karl B. Andersen
Journeyman Smith
Good Morning Karl
Thanks for the response.
I had figured out it wasn't going to be an easy task. The arm is long with nothing to stablize it.
I can see precision being the key. Does the Grizzly arm have a tracking adjustment?
Your picture and response were great!
Thanks Karl!
Russell
The tracking adjustment is around the back side of the the tracking wheel at the top.
The arm is long because the belts are 6 feet long.
It's solid as a rock.
Same belts we use on our grinders.
Karl B. Andersen
Journeyman Smith
Russell
See this link. grizzly grinder parts You need Part 36A and everything above it less the platen. The Grizzly grinder part 36A mounts to its base by that big ring that is welded to the bottom. You will need to cut this ring off and make a new one that fits your surface grinder spindle housing. Then simple line up the tracking wheel with your contact wheel and weld the arm to your ring that you made for your surface grinder.
There is some thinking involved in how you need your contact wheel machined to not only fit your spindle, but also be positioned so you do not have to make elaborate fabrications to get the 2 wheels to line up.
My setup is similar to Karl's.
Brian
Russell
Soem additional info
What kind of surface grinder do you have? If you have a Brown and Sharpe 2B, I can give you the wheel dimensions that I used. If not, post your model here anyway and domeone may have already done what you are looking to do.
Your wheel size is dependant on how fast you want your belt speed to be, but also how much HP you have. The larger the wheel, the faster the belt speed and the more HP will be required to take the same depth of cut. Since you are stuck with the HP, you need to go with a smaller wheel to still be effective with your cuts. Remember too that you will be taking wider cuts -- up to 2" -- and you need the power to do so.
Although my grinder takes a 7" grinding wheel, I am using a 5 1/2" contact wheel.
Brian
Brian and Karl
My grinder is a Reid, with a 1 hp motor.
The schematic you sent sure clears up how it is mounted.
You guys have been a big help on this!
Thanks
Russell

