Hi Gents
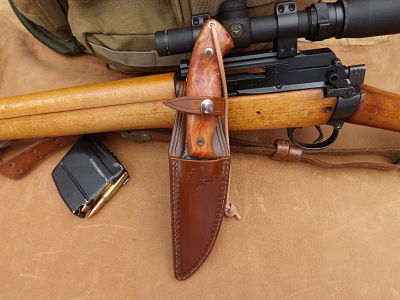
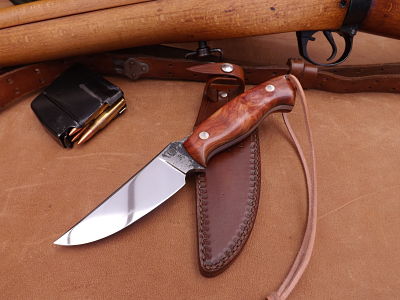
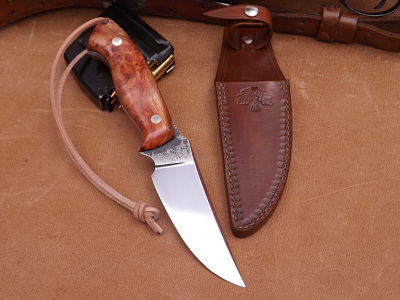
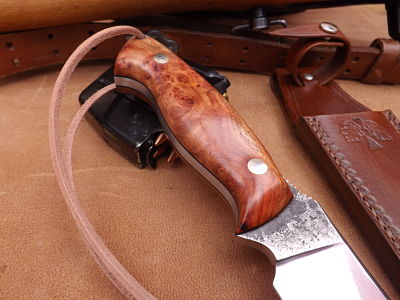
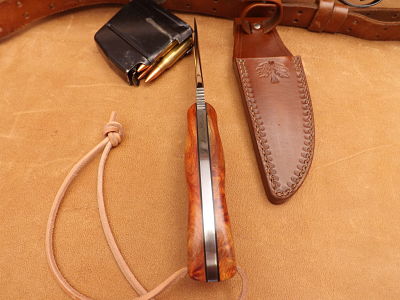
This knife was forged from EN43. Blade length is 115mm, overall length is 250mm and just under 6mm thick. The handle is Amboyna burr with black fibre liners. The sheath is double welted and dyed saddle tan. Thank you for taking the time to look. All feed back is very much appreciated.
All the best
Steve
Good looking knife there Stephen. Love the slight upsweep. Also like the enfield in the background. Great work!
Brion
Brion Tomberlin
Anvil Top Custom Knives
ABS Mastersmith
Beautiful lines, nice sheath and I also love the background! (7.62mm?)
Chrs
Thanks for your comments gents they're very much appreciated. The rifle is an Enfield, it's an L39 A1 chambered in 7.62mm. It's a beauty to shoot.
Cheers
Steve
Steve,
I would like to here a little bit about the finishing techniques. I really like the duality in surface textures. How did you get the mottled appearance on the ricasso area, and how fine did you hand sand before buffing for the mirror polish?
I'd also like to see a pic of the handle spine, if you've got one.
Joshua States
www.dosgatosforge.com
https://www.youtube.com/channel/UCdJMFMqnbLYqv965xd64vYg
https://www.facebook.com/dos.gatos.71
Also on Instagram and Facebook as J.States Bladesmith
“So I'm lightin' out for the territory, ahead of the scared and the weak and the mean spirited, because Aunt Sally is fixin’ to adopt me and civilize me, and I can't stand it. I've been there before.â€
Hi Joshua
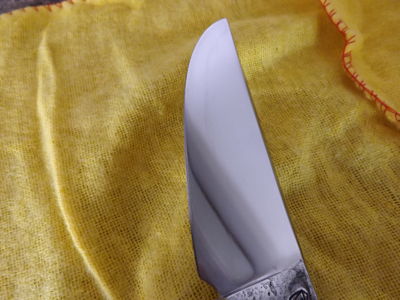
The finish on the ricasso area is achieved by leaving the forge surface left on. When cleaning back the blade area around the primary grind, that portion of the ricasso has been cleaned slightly by the scotch brite buffing wheel that I use. The section closer to the handle retains the darker looking forge scale. This is the contrast that you can see in the pictures. It's the same as forging a Brute-de-forge, I would normally only polish the primary grind and that gives you the contrasting surfaces between the ricasso, blade flats and the primary edge.
The knife originally was to come with a satin finished blade, but as I came to the hardening stage I decided to use an anti scaling compound that I've been experimenting with. It's made from Boric acid and iron oxide. After mixing this with water and applying it to the cutting edge I thought I would then mix the remaining paste with some castable refractory that I have and apply a much thicker clay to the rest of the blade and the spine and see if I could get a temper line in the steel. I was just experimenting really.
When cleaning back I could see that there was a very faint quench line between the two different thicknesses of clay. So I cleaned the blade back to a 4000 grit finish with Micromesh and a little metal polishing paste. I haven't taken the blade to a polishing buffer, if you turn the blade in the light you can still see some very faint scratches running lengthways on the blade. I've left it at this stage because I didn't want to remove the temper line which I'd brought out at this point. The quench line has been enhanced by applying distilled vinegar mixed with mustard powder. It's very subtle and I don't really feel that I could call it a proper Hamon because I had to use the vinegar to develop it. The polish was a compromise really to keep the quench line, so it's not satin finished and not what I would call a proper mirror polish.
I've also attached another picture of the spine of the blade for you and one trying to show the quench line, but I don't think it has photographed very well.
I hope I have managed to answer your questions for you without waffling on to much.
All the best
Steve

