Anyone got experience with using ladder dies to bring W-pattern up to the surface?
I'm welding up a billet of W-pattern and have some questions about using this process.
Thanks
I tried doing what we discussed at your hammer-in with limited success. Haven't given up on it though. It sure seems like it should work well.
Gary
|quoted:
Anyone got experience with using ladder dies to bring W-pattern up to the surface?
I'm welding up a billet of W-pattern and have some questions about using this process.
Thanks
Hi Steve, I dont know if I'll be too much help to you, But I like to use dies for laddering. For the obvious reasons, I gant "grind Through" the pattern, and I like the uniformity it gives me. Heres a not-so-good pic of the billet. If my memory serves me...It stated as a lower layer 12-14 layers then drawn and cut into 4 pcs twice, then laddered.
Shawn
This was a standard"random" pattern billet. included just to show manipulation.
Hey Shawn,
Thanks for the reply. This is just the information that I was looking for. I meant to post more information about what I was attempting, but kept getting interrupted while typing .
I am making the steel for a damascus bowie. I started with a 22 layer billet and then forged it on the bias. I've cut it into 4 pieces and restacked twice; making 16 w-pattern layers. I've been debating with myself about how many w-pattern layers I should use in this billet.
I plan to forge the billet down to about 3/8", forge in some distal taper, then forge the bevels to a little less than 1/4" at the edge. Then, I'll press the pattern into the stock.
I've modified my top pattern die to be able to move and conform to whatever angle I have forged into the stock for the edge bevels of the blade. My thought is, if the pattern is pressed in after the bevels are forged, I will get better pattern definition at the edge of the blade; rather than stock removing the blade from a patterned piece of bar stock, or forging the edge bevels after patterning.
If this works well, I'll post a picture of the dies to show how I modified them.
I welded the last restack of layers today and pressed the pattern into the bar of blade stock. I'm pretty happy with how it is looking so far.
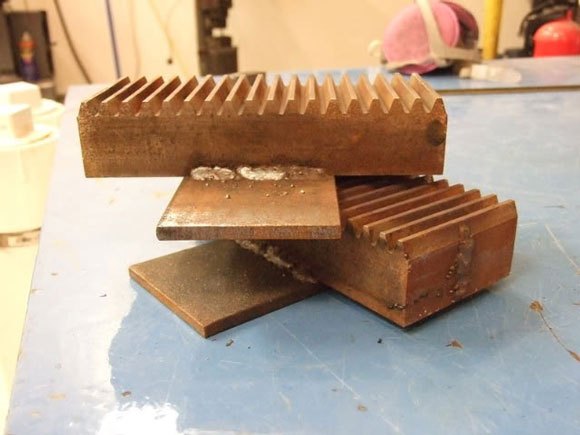
Below are the dies that I used; with my modifications. These are West Texas Wind dies. Not sure how that is going to look in a w-pattern; but we'll see.
I drilled the mounting plates for the dies and put 1/2" pins through them to keep them aligned. The holes in the top plate are 17/32" and have been tapered top and bottom with a countersink, leaving about 1/8" of the hole in the center at 17/32". I then used strips of sandpaper to break the edges inside the countersunk holes to help the top plate slid on the pins without binding.
I welded a sectioned piece of 2" round bar to the top plate, centered over the pattern die. I leave the top flat die in the press and use it to press on the round stock. The plate for the top pattern die just sets on the springs. The washers under the one spring help to align the top die to the taper of the blade bevels. The round bar allows the die to adjust to the angle of the blade bevels. I found that it helped to grease the piece of round bar to help it slide against the flat top die.
Also pictures of the side, edge and spine of the blade stock, after pressing the pattern in.
I like the angled pressing rig!
I ground the ridges formed by the pattern dies off, etched the bar stock and cut the blade shape from it. Here's what the blade pattern looks like. Still need to forge the tang.
Very cool Steve! I like the approach for laddering on tapered stock as well. I'll have to remember that in the future!
-d
Just got the blade finshed for this knife. Here's a photo of how it came out.
Looks great Steve. I like the blade shape too.
Thanks for the appreciation, Lin.
I'm trying some innovative (for me) stuff on this knife. I'm photo documenting the entire process of making this knife. I plan to post a WIP later.
It is looking good Steve. I am curious to see what you are going to do with the handle and guard. Also how long is the blade? just curious. Good stuff.
Brion
Brion Tomberlin
Anvil Top Custom Knives
ABS Mastersmith
The blade is 8 3/8" long. The handle will be a stag taper.
The fittings will be mild steel that I will hot caustic blue. The guard and ferrule will be heavily sculptured; if I can pull that off. I have an idea for the ferrule design that I don't recall seeing anyone do before.
I've done sculptured fittings in the past, but what I am planning for these is in a theme that I have not tried and will require techniques that I do not have experience with. We'll see if I can accomplish what I have planned.
Very nice knife Steve, the angled jig is an awesome idea, thanks for sharing.
|quoted:
Thanks for the appreciation, Lin.
I'm trying some innovative (for me) stuff on this knife. I'm photo documenting the entire process of making this knife. I plan to post a WIP later.
I'll be looking forward to seeing your WIP.


