A quick tip that may help folks wanting to experiment with clay coating blades. One of the problems that many seem to have when starting out is getting the clay to "stick" to the blade while bringing up to heat. There are a few easy steps you can take that will ensure good adherence of clay to blade.
The first step is to not have the blade sanded above 220 grit, seems that above that and the clay wants to lift when introduced to heat. I only grid to 120 before clay application, and when I had a bead blaster (broke now) I would also bead blast the blades, which REALLY made even the lightest clay strokes/lines stick.
Second is to make sure your blade is clean, as in wiping down with denatured alchohol, MEK, acetone etc... several times to ensure the blade is absolutely free of oils of any kind. Make sure and wipe down with clean paper towel/cloth several times after wash.
Generally as im mixing clay I have my forge heating up, by the time I get the blades cleaned appropriately the forge is "hot". At this point after the clay is applied, I turn the forge "off" and stick the blade in (clamp tongs around tang to "hold"). Leave the clayed up blade in the "off" but hot forge for several minutes. This step "bakes" the clay onto the blade, ensuring it will adhere during the process. In doing this "bake" method hundreds of times I may have had the clay lift 2 times, if memory serves me both times were when I had the blade over 220 grit.
After clay is "baked" on, remove the blade and bring forge back up to desired heat. Go through your normal h/t sequence after that, everyone seems to have a slightly different method on these final steps, I simply bring up the blade to 1500 with a very quick soak and quench in Houghton G. Remember quench "volume" is very important, and often overlooked.
Just wanted to share a few quick tips, we can discuss further if anyone has questions or wants to share information. Here are a few pics-
Here is a pic of the clay just applied, still "wet"

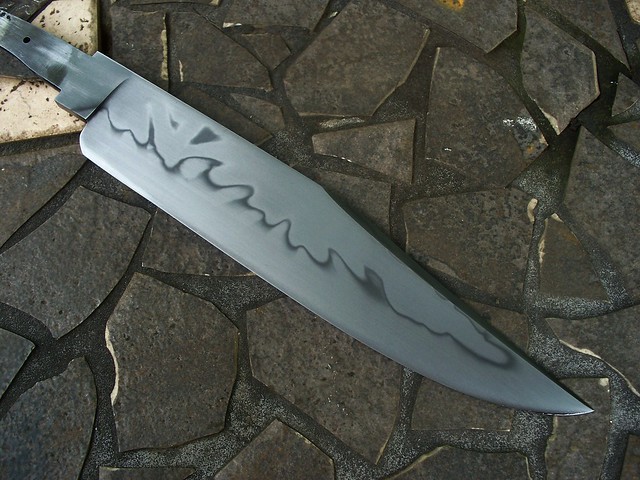
Here is a pic of the blade after the "baking" in "off" forge-

After Ferric Chloride etch-

One after a quick sanding/polish for a "working" grade hamon
Very, very cool! I'm still a little hazy as to the reason to coat in clay...I've found, thanks to Brion and Kevin that a full quench with a tempered spine makes for a very springy blade....so why do I still see so many clay backed blades? Is it just for show, or can a clay backed blade be springy as well, if done correctly?
Here's what I've found:
Full quenched blade, back tempered: It will spring about 40 degrees, and bend back perfectly straight. NO bending point. However, once taken past that 40 degrees, it will snap.
Clay backed: Will bend 10 degrees and spring right back. After 10 degrees, stays bent about 1/4" for every extra 10 degrees you add.
Any way to get a blade clay backed so that it will bend 40 degrees, and spring back true, but once pushed past 40, will have a bending point? Sorry if I am sounding unclear....Im just curious. Very nice hamon, btw!!
I had the same question as you when first starting to do the clay treated blades. Jimmy Fikes and I did bend tests on properly treated blades (hardened at lest 1/2 way up). We tested 3 or 4 (hard to remember, nearly 10 years ago), camp/Bowie size blades forged from 5/16" thick 1095. We used a cheater pipe to bend around the 30+/- degree mark (don't know exactly), and the blades all came back to true. We weren't measuring the bend angle exactly, just wanted to make sure under real conditions the blades would be far more then suitable for tough/hard use. The VERY IMPORTANT key is to have AT LEAST 1/2 THE BLADE HARDENED. These skinny/low/shallow hardening lines you see a lot of are not suitable in my opinion.
So, in building a hard use knife would I shy away from a properly clay treated blade, hell no. Does it have any advantages as far as performance, nope. Do they sell for more money, and generally sell quicker, yep.
This is about as "low" as I would ever go on a hamon... and this one "almost" got re treated-


Matt thanks for the information. I also go only to 120 before heat treat and clean. Another thing is clay coating thickness. When I first started doing clay coatings I figured put it on thick, because it is supposed to act as a heat blocker. I found out that a thin coating actually works better and gets more activity. Thank you Don Hanson.
Good to see you on here Matt.
Brion
Brion Tomberlin
Anvil Top Custom Knives
ABS Mastersmith
Aha, so that's it! I was layering my clay in a straight line all the way up half the blade, but it always ended up leaving 1/3 of the blade hardened. Thank you for explaining that!
1.I also assume that this means that once past 30 degrees, there is a small bending point, which can be used to straighten the blade, right?
2. Im using 5/16" thick 5160- how thick do I apply my clay? I can see by your previous picture how to make it look, but how thick does it get? Brion mentioned to make it thin, but exactly how thin?
3. Lastly, what clay do you use? Ive been using refractory cement...does that work well? I usually leave my clay to dry from 2-3 days...then I HT. Does that make a difference?
Sorry for all the questions- I do appreciate all the help!! My mom said that she wishes I was as hungry for school knowledge as I am for knife knowledge <img src=' http://www.americanbladesmith.com/ipboard/public/style_emoticons//smile.gi f' class='bbc_emoticon' alt=':)' />
The higher the hamon is on the blade the more spring it will have to it. I have tested blades with different height hamons as Matt has and found the same results. I tested to destruction one W2 blade with a low hamon, say 3/4" up from the edge. I was able to bend it almost 180 with only small cracks right in the edge. Would I do this for a hard use knife? No, but it was just part of the testing and interesting.
As for 5160, not really the ideal choice for hamons as it is a deep hardening steel. You may get a line but not really like the picture Matt posted. 5160 is great for hard use knives, such as choppers, but the 10 series steels like 1070, 1095, and W1 and W2, will work much better for hamons.
Brion
Brion Tomberlin
Anvil Top Custom Knives
ABS Mastersmith
with 5160 I wouldn't even bother using clay if your trying to get a very active line. The clay I use is dry form satanite, buy it by the 50 lb. bag.
On clay thickness, thick lines will give a thinner but more distinct line, thinner areas will give a wider line, you can vary the thickness using a plastic knife or anything like that, just "drag" up the clay, lifting as you pull, this will give that really wide white area.
Great- I think I will continue to full quench with the 5160 bowies, and if I ever get a 10 series, use clay. Great advice- thanks to both of you!
