
All 4 blade I quenched yesterday came out with this spotty effect and I don't remember getting that result the last time I did this at the ABS school but there was a lot to absorb in a short time.
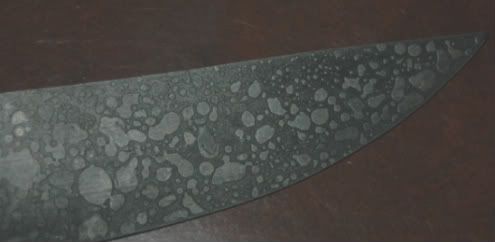
Is This Normal Or A Sign Of Something Wrong?

I've not seen anything like that myself... yet. However, looking at the patternation/spots, I'm wondering what temp your quench medium was at and if you cleaned or treated your blades with anything prior to quench? I'm totally guessing, but the spots make me feel that there may have been a vapor barrier during quench or there may have been a deposit of something on the blade prior to quench. Have you tried to sand off any of the spots? If so, I'm wondering if they reappear with a light etch?
Hopefully someone with experience will jump in and help us both out.
Rick

How hot was the blade when quenched? What kind of heat source? How rich was the heat source? What kind of steel did you use? Did the heat source contact the steel directly?
I've seen similar things happen to steel after a quench and it's usually from the heat being to high at quench or the steel being exposed to too oxygen rich an environment while heating. Take it down to bare metal, do you still see the spots? If so, it just may be one of those reasons.BTW, those spots may indicate areas of decarb that need to be ground away.
JD Smith
Master Smith
|quoted:
I've not seen anything like that myself... yet. However, looking at the patternation/spots, I'm wondering what temp your quench medium was at and if you cleaned or treated your blades with anything prior to quench? I'm totally guessing, but the spots make me feel that there may have been a vapor barrier during quench or there may have been a deposit of something on the blade prior to quench. Have you tried to sand off any of the spots? If so, I'm wondering if they reappear with a light etch?
Hopefully someone with experience will jump in and help us both out.
Rick
Hey Rick thanks for your thoughts I hadn't considered vapor barrier not enough agitation perhaps
My quench(Parks AAA) was about 105 and I didn't clean or treat them and no didn't get to sand them yet tomorrow I'll do that and see what a quick etch reviles
|quoted:
How hot was the blade when quenched? What kind of heat source? How rich was the heat source? What kind of steel did you use? Did the heat source contact the steel directly?
I've seen similar things happen to steel after a quench and it's usually from the heat being to high at quench or the steel being exposed to too oxygen rich an environment while heating. Take it down to bare metal, do you still see the spots? If so, it just may be one of those reasons.BTW, those spots may indicate areas of decarb that need to be ground away.
I'm working with 5160 in a forced air vertical forge so a oxygen rich an environment maybe my problem.
As for the blade temp I'm watching color and using a magnet that's all I have to work with right now
thanks JD you have given me much to consider

|quoted:
Hey Rick thanks for your thoughts I hadn't considered vapor barrier not enough agitation perhaps
My quench(Parks AAA) was about 105 and I didn't clean or treat them and no didn't get to sand them yet tomorrow I'll do that and see what a quick etch reviles
The AAA should not be the culprit it is really good about producing very clean blades. By the way, my compliments on using an excellent quenching medium for 5160, you will not find an better quench for that steel, and it makes it much easier to diagnose your problems knowing you have that quenchant. I would listen to these guys about the clean up and etch. I suspect you will find a silver grey patchwork look from the etch, which would be classic decarb. J.D. has you going in the right direction to avoid it in the future.
"One test is worth 1000 'expert' opinions" Riehle Testing Machines Co.
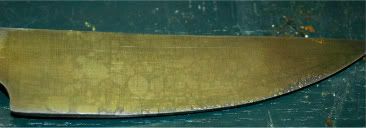
I cleaned it up and gave it an etch and here is what I have.
The etch revealed all the spots that were there after hardening,now I have to tell you I really don't know what this tells me except there is something wrong.
Do you guy think this is decarb and what are the main reasons for it?
I think that I'm getting the blade too hot too fast.
I'm going to weld up the end of 2" pipe and use this in my forge to better control the environment in my hardening process.
Now the question is this worth finishing or do I throw it on the scrap pile and take it as a learning experience.
Thank you guys for your time and patience
It's definitely decarb my friend. the close ended pipe thing is a great way to to keep the blade from contacting the heat source. It also helps if you pack the last inch or so of the pipe with vermiculite. This lets you keep the thin point protected from overheating while the rest of the blade comes up to temp.
No need to toss this one as the damage from decarb is only on the surface. I presume the blade is thick enough to withstand the removal of the decarb layer, if so, go to it. As well, in the future, make sure the atmosphere in the forge is properly adjusted to be reducing(You're using gas right?)as in flames reaching out for oxygen at least 6-10"'s. one of the methods I use to keep the forge environment from damaging the steel is to get the forge up to almost welding heat level. Then, warm the blade at the opening of the forge till it starts to show color, then I shut down both air and fuel, in goes the blade and the radiant heat from the refractory continues to slowly bring the work up to temp.
JD Smith
Master Smith
You know on second thought, consider breaking this blade to take a look at the condition of the grain. If it's big and pebbley; too hot, too long, if fine and felt-like things went right. But I've got a sneaking suspicion the grain is blown out. Maybe even renormalize a few times and do over.
JD Smith
Master Smith
|quoted:
You know on second thought, consider breaking this blade to take a look at the condition of the grain. If it's big and pebbley; too hot, too long, if fine and felt-like things went right. But I've got a sneaking suspicion the grain is blown out. Maybe even renormalize a few times and do over.
Ok heres the deal I'm not going to break the one we have been looking at but I will break another one from the same batch its in the same condition.
I'll see if I can get some macro shots of the grain structure to post.
The one we have been looking at is getting a handle and tested in other ways

I am learning a lot from this thread folks and hope you don't mind me interjecting with a question or two of my own Lyman? JD, when you talk about the blade coming in contact with the heat source, are you talking about direct contact with the flame? Should we introduce the blade to the heat peripherally, slowly bring up to quenching temperature, and avoiding the flames?
I too have basic equipment propane fueled 3 burner forge with no blower. I typically bring blades up to just past non-magnetic while evenly moving through the flame. I try to get an even heat distribution through the blade then quench in my horizontal tank, moving the blade in a straight direction forward and back. I interrupt the quench after about a count of seven seconds, then immerse. My quench-ant is heated to approximately 120-150 degrees for 5160 or 1095.
I am saving up for a heat treat oven and was wondering if the oven can be used to eliminate this problem...ie,....bring up to temperature in the oven and quench as opposed to using the forge for this application?
Thanks for allowing me to interupt,
Bob
[size="7"]bobbywett[/size]

I am certainly not JD or Kevin but I might be able to point you in the right direction.
Electric ovens can help with some of these problems but introduce their own. There is no fuel, but plenty of oxygen, so decarb can still be very much an issue. Most use stainless foil or a coating of some sort with these ovens to help prevent it or at least greatly reduce it. Also it is usually recommend bringing the oven to temp ( or close ) and then putting the blade in. The coils get far more hot that the 1500 or so you want the blade to get and can overheat your work before the liner of the oven comes up to temp. I wont even make a fool of myself by trying to explain conduction, convection and the like but there are reasons for this.
Electric ovens can give you far more control that a basic forge but there are steps that need to be taken to assure you are getting what you want from them.
I hope this helps.
Seth
Seth Howard
Apprentice Smith

John White and I spent some time discussing prevention of scale during his work on the D-guard Bowie that he recently posted on this site. Maybe John will chime in to this thread.
John used ATP-641 anti-scale compound. ATP-641 can be purchased from Brownell's. I had tried the ATP product, but it caused pitting on my pieces. Apparently, there is a correct process for using ATP that I didn't follow. John got information on the proper use of this product from the ATP company; John is now the ATP expert. <img src=' http://www.americanbladesmiths.com/ipboard/public/style_emoticons//biggrin.gi f' class='bbc_emoticon' alt=':D' />
I have been using stainless steel foil for heat treating items that I didn't want to have scale up. I always put a sheet of toilet paper in the foil pouch with the part. The burning of the paper uses up the oxygen in the pouch. Using the foil is a pain though, because you have to get the pouch out of the kiln, cut it open and remove the part for quenching very quickly. No a lot of fun with a 1500 degree item in the open door of a hot kiln.....
During the discussions with John, I discovered that Paragon Industries makes a kit to inject argon gas into a kiln. The argon displaces the oxygen in the kiln to prevent scale. The kit is very simple; just a gas flow regulator and a nozzle to bolt to the outside of the kiln. A small hole is drilled through the fire-brick for the gas to enter the kiln. I am going to install argon injection on my kiln (when I get time) and give it a try.
Thanks for the information Seth & Steve....I've narrowed my search for an oven down to an Evenheat or a Paragon....now I just have to determine the depth of the chamber. I agree Steve with the notion of avoiding the fun one might experience removing foil from critically heated blades. There has got to be a better way of preventing de-carb? I'm going to check out Brownell's Injection System you spoke of, but the idea of drilling a hole in a $1500 oven is scary.
Thanks for the replys
Bob
[size="7"]bobbywett[/size]
Hey Bobby,
It is Paragon that has the injection system. The hole through the firebrick is only 1/8 inch in diameter. Paragon will probably give you installation and use instructions with the unit. They sent the information to me. I can add it to this post later, when I get to my other computer.
