|quoted:
Light pressure with a new file will skate, hard pressure will cut, but you have to have a heavy hand or it will skip on you. When it acts like that, your good to go.
Keep in mind that everytime you perform this test, the file gets more dull.
I realise this may affect the final hardness(some say it may increase the speed of the quench) but I use an electric kiln for HT and experienced a lot of decarb so my solution was to to coat the blades in clay slip. Just a very thin layer. It made a huge difference. I get very little decarb. The blades are easier to finish and I don't have to go digging for hardened steel anymore. I couldn't tell you if I have gained or lossed a few HRC points with the clay slip but I am more than happy with the results.
|quoted:
Keep in mind that everytime you perform this test, the file gets more dull...
Controls are very important as a baseline in any test. One thing I always show students about the file is to use two parts of the knife. The tang is often softer or not hardened at all and I always teach my students to first cut the tang with the file they are using and then test the edge so that they can feel the distinct contrast between the two. It is kind of like calibrating your file, regardless of its condition. This methods is particularly useful when the knives have been tempered and will cut a little and one needs to know how much is cutting a little and how much is dead soft.
By the way Rick, welcome to the forum, it is good to see you made it here. For researching bladesmithing stuff you will find this forum like a library or attentive lecture hall as opposed to trying to study in a rowdy saloon on a Friday night. <img src=' http://www.americanbladesmith.com/ipboard/public/style_emoticons//wink.gi f' class='bbc_emoticon' alt=';)' />
"One test is worth 1000 'expert' opinions" Riehle Testing Machines Co.
|quoted:
By the way Rick, welcome to the forum, it is good to see you made it here. For researching bladesmithing stuff you will find this forum like a library or attentive lecture hall as opposed to trying to study in a rowdy saloon on a Friday night. <img src=' http://www.americanbladesmith.com/ipboard/public/style_emoticons//wink.gi f' class='bbc_emoticon' alt=';)' />
Yeah... I noticed that straight away. You may laugh but I get that erie feeling like something bad is going to happen. You know, like when dog is rescued from an abusive kennel and put into a new nurturing home... it still cowers when you reach out to pet it.
There is a lot of good information in this forum and most of it is focused on decarb which is important. Some of it is asking you to train your eye to see the color shifts as the steel absorbs or loses energy (heat) to transition from one phase to another. That is a skill you need to acquire. I would suggest another learning exercise you could perform to learn more about what is happening with your steel. Cut or draw out a piece of your steel so that is is roughly about a quarter to a third of an inch in diameter and about a foot long. Place this in your forge so that one end gets quite a bit hotter than non magnetic and the other end close to your tongs is quite a bit below the temperature you would quench from. Try to get the middle of this foot long piece of steel right at the temperature you think is the correct quenching temperature. So it is very hot on one end and much cooler on the other. Quench the whole piece just like you would a blade. Now let it cool and then do the following (do not temper). Start breaking off 1 inch or so pieces from the hot end to the cool end. You should be able to do this easily on your anvil with a hammer. Look closely at the grain structure of the broken pieces. What you should experience is the following: It should be easier to break the pieces of the end that got very hot and the grain structure will look large. If you got the middle right the grain size should be getting really small and it might be just a bit harder to break it. Towards the cool end it should get noticeably hard to break the steel and you might find it just does not break with a hammer. When you get to that point, stick it in a vise and bend it back and forth until it breaks. The grain size should be fine and it should bend quite a ways before it breaks.
The exercise will do a couple of things. It gets you to see the changes in grain of the steel based on temperature and allows you to get feedback on whether the area you thought was right on the money for quenching the steel, really is. Also, if you get large grain in the steel where bending was required (colder end of the piece), then you probably needed to do a better job of normalizing the steel before you try hardening it.
Dan P.
Thanks Dan,
I performed that test with an old file and used it as a demonstration piece for a Chemistry presentation. It's really cool seeing the different grain sizes. After quenching a blade, do you always want the grains to be as large as possible?
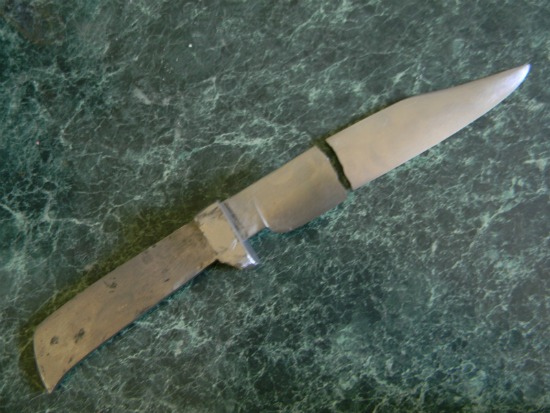
Unfortunately, I have some bad news. I have been working on this blade since the beginning of last summer, and I really liked the shape, but something happened. As I was hammering the guard onto the tang to get it nice and flush, I looked at the blade and, to my horror, it had snapped in two! It's upsetting to have that happen after so many hours of work, but at least I've learned a lot (including to always make a backup). Here's a pic of the broken blade:
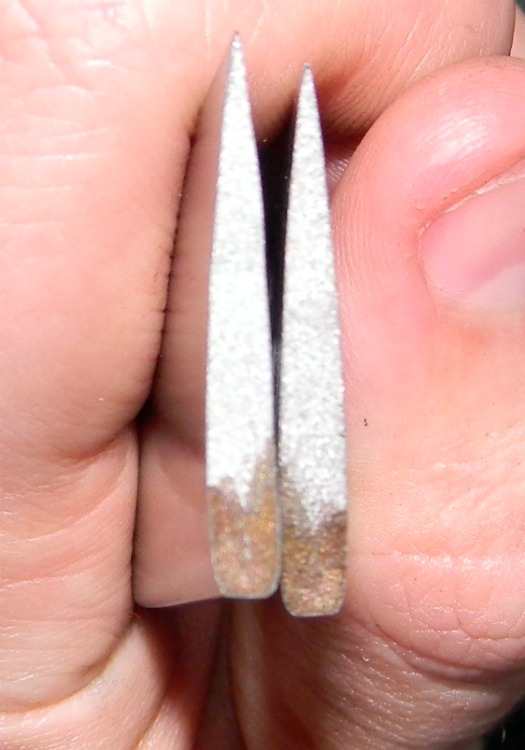
Thinking back I realized that I forgot to draw the tang. (Did I mention I did a full-blade quench?) Here is a picture of the broken edges, sorry if it's difficult to see:
I don't know why the spine is a darker brownish-straw color. Could that be a result of poor or not enough tempering?
Thanks & Happy Easter,
~Josh
Hello Joshua. Actually you would prefer the grain be small and fine, almost like grey velvet, this is after quenching and before, after normalizing/ thermal cycling. When you are forging the steel you are at temperatures that can promote grain growth, which is not good. The thermal cycling when you are through forging is done to reduce stress and reduce grain size. I usually do mine right after I am through forging the blade and then do an anneal cycle.
In the second picture it looks like the grain is large, which is not good for blade strength. The dark area looks like there was a crack which allowed water or oil to get in. Knifemakers just love those OOPS moments and I have had my share and will have more. What was the steel in the blade?
Brion
Brion Tomberlin
Anvil Top Custom Knives
ABS Mastersmith
Joshua, that blade was severely overheated at some point (probably during hardening). The dark coloration at the spine indicates that the grain size resulted in a stress fracture which went unnoticed until it was given the incentive to suddenly propagate though the entire blade, which is the new shiny surface. Individual grains should not be able to be seen with the naked eye, if they are where we want them for knives, yours are very clear. A good way to compare is to break a quality file that you have worn out (just because you wouldn’t want break a good one) and look at the velvety grain of the ends, that is the least you are shooting for knives.
Large grains do several things. The first is that they promote much deeper hardening and thus increase the risk of warping and cracking. They will also provide a much easier and direct path for fracture propagation, reducing the toughness of the blade exponentially.
"One test is worth 1000 'expert' opinions" Riehle Testing Machines Co.


