I understand the transition between the riccoso through the guard to the handle must flow, be symmetrical and look natural. What I don't fully understand is how so many get that smooth transition from the guard finger curve to transition so nicely into the handle. I can get it there by using a one inch small wheel then hand sanding using a rubber hose on 3/4 inch steel round stock which comes out to one inch. I would really like to hear how others are getting this transition to look great and the lines to flow evenly they way they are intended to.
Hello Robert. I also use a small wheel on the grinder, 3/4" diameter. I can get it pretty close and clean up with a 400 grit j-flex belt and leather backing on the platen. The leather is 9 oz and removeable. This has some give to it and gets a smooth transition. I will try to get you a picture. You can also use a rotary platen which has the same effect. I just do not have one of those, on my list though. I can then use a foredom tool or variable speed dremel with 1/4" and 1/2" sanding drums or sleeves. I have the sleeves in 220 up to 600 grit. Great things. I get mine from Riogrande jewelry supply. And there are always files, a half round and barrette files being the main ones. Just takes time and care. I can then hand sand the guard and handle.
Brion
Brion Tomberlin
Anvil Top Custom Knives
ABS Mastersmith
Robert, this area is kind of like the blade plunge. It will take practice but it will often define you as a maker. Your work will be recognized from your control over that detail of the knife. I use a rotary platen when I can but sometimes there is no way to get in there with a machine's assistance. Take a sub hilt for example. You might have to just get some round files and slowly and carefully remove the material. I concentrate more on the metal than the wood, knowing that the wood can blend to the metal better than vice versa. I imagine that each maker will have his own pet technique to handling this area and although he might not keep it a secret, you'd have to spend time watching to really know how he does it. This is where the videos are so nice.
Thank you for your input,
I read an article Steve Culver wrote on guard design and it really helped me with determining relationships. Steve also uses a 1/2 inch end mill to preform the finger guard. It was this one step that got me to looking a bit closer at the transition area. As you know, preforming with an end mill doesn't give a rounded transition up the sides. As I looked at various pictures on the ABS site I noticed that some have left this area a bit flat with little transition up the sides.
As I prepare to make my knives to present for judging I run into more and more questions. I appreciate everyone's willingness to help and share.
Brion, how do you attach the leather to your platen so it is removable? I have a good supply of leather, some saddle skirting, and will give it a try.
Lin, can you recommend a video?
Robert,
I use the end mill to hog off excess guard material, rather than saw and/or grind it away. The radius of the end mill cut, also prepares the guard for shaping. When I install the handle on the knife, I always leave extra handle material extending below the end mill cut in the guard.
After the handle is attached, I use a 1/2" small wheel and 120g belt to cut the handle material down to the end mill cut in the guard. When the grinding belt gets down to the end mill cut, I start to roll the knife sideways against the small wheel to roll the radius up the sides of the knife. Kind of just hanging the finger guard on the small wheel and turning the knife against it. After shaping the rounded transition in the guard, I continue using the small wheel to grind away excess handle material at the bottom of the handle and also shape the sides of the handle just behind the guard to match where I rolled the radius up the sides.
I blend all of this together, using a 1" scalloped edge grinding belt, running the belt slack. I only have 320g scalloped belts in my shop. The 320g belts do this work just fine. I will use a sharp belt at first, then change to a belt that is well used. The scalloped edge belts will roll around curves and not cut divots in a corner, like a belt with a straight edge will do. I have made my own scalloped edge belts by cutting down a 2" belt with pinking shears. I've cut belts down to near 1/4" wide, to work in very narrow areas. I buy the scalloped edge belts from Pop's. Pop's Belts
The belt work usually doesn't finish off the rounded transition in the back of the guard completely. I use my Foredom tool with a 1/2" drum to clean this area up. I've got sanding drums in a number of fine grits, but have also used double sided Scotch tape to attach strips of sandpaper to the drum. This doesn't work so well with a Dremel tool. A Dremel runs too fast and will sling the paper off of the tape. <img src=' http://www.americanbladesmith.com/ipboard/public/style_emoticons//ohmy.gi f' class='bbc_emoticon' alt=':o' />
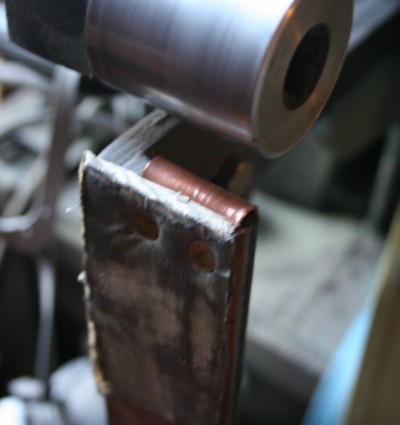
Hello Robert, Steves method is about the same as mine, except I do not use an end mill. Saw and grind here, but after the initial shaping that way, then the small diameter wheel. Did I mention I love the 1/2" and 1/4" drums for my foredom? Great things. The leather cover for the platen is made from a 9"X2" piece and has a copper clip attached. It basically just fits over the top of the platen and belt tension holds it in place. The copper work hardens so that when it is bent in to shape it gets springy. I use two leather rivets to hold the clip to the leather. Over three years old and still in pretty good shape.
Kind of ugly but effective. I can roll the belt off to one side or the other and use it for feathering things in.
Brion
Brion Tomberlin
Anvil Top Custom Knives
ABS Mastersmith
Good stuff guys, thanks!
In addition to the small rubber sanding drums for the flex shaft there are split sanding mandrels or shanks. You can cut small strips of various grit sandpaper to use with them. It's cheap, easy and efficient. They can be gotten at jeweler's suppliers or made. Just cut the head off a nail and saw it down the center lengthwise with a jeweler's saw.
Well, the first thing that jumps out at me is that I am initially using too large of a wheel. Makes sense that if I use a smaller wheel I will be able to work into the final dimension instead of trying to get too close right away.
Brion, thanks for the pic, speaks volumes, simple and works. I have all the components so I will put one together in the morning.
Steve, thanks for the follow up. It clears up the details. I looked up the scalloped belts and I'll be ordering some to give them a try.
I can't wait to get out to the shop and get my guards prepped. I will try to remember to take some pics along the way and follow up with a post when I get one presentable.
thanks to all for your input,
Robert
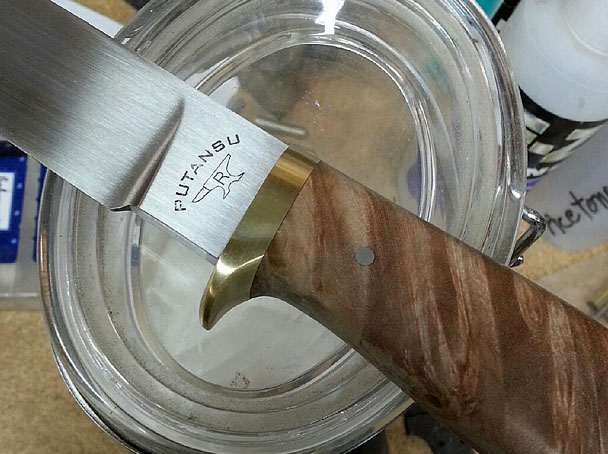
I finally got out to the shop for a couple days and finished the blade, guard and handle. I took the information and advice from this post and gave it a try. I used Microsoft Word to draw the guard, not that great of a program for it but it worked. After finishing the blade I fit the guard and used the mortise process to fit and install the handle. I used a 1/2 inch small wheel to get the guard profile started then a flexible shaft with a 1/2 inch sander to fair it in and finished by hand. I used different little sanding blocks I made to fair in and finish to 1200 grit.
I am ready to receive some advice to help me along. This was a real helpful learning experience and helped me better understand how to plan for the end product. I have always used the build as you go process. It was a whole lot easier to have a plan of attack. I am not much of a tech type using computers however I am willing to learn more.
Here is a picture of my progress.
Nice Robert, that is what we are talking about. One little thing, just personal preference here. You might want to use thicker guard material, say 3/8", for a better balance and transition. Good job.
Brion
Brion Tomberlin
Anvil Top Custom Knives
ABS Mastersmith
Thank you,
Yes, thicker material definitely. I have a question about the transition, the transitional wood being below the "Flow" line but the bottom line of the handle being inline. Is that OK or is that what the thicker guard material makes up for? I may have just answered my own question but it's worth asking.
Another thing that I am not sure of, how thick/wide should the guard be at the ricasso? 5/8" to 3/4" for a 4 - 6 inch skinner? I have rather large hands so I have to be careful with what is comfortable for others. I guess staying on the smaller size would be safe.


