This article is an excerpt from pages 6-11 of the Book “Handles and Guards†written by Joe Keeslar, MS and reproduced with permission from the author and the American Bladesmith Society, Inc.
Selecting and Making the Guard
Once the handle material has been selected you should decide on guard, bolster, and butt cap material. Like everything else in making a knife there are a number of choices possible depending on style, purpose, cost and materials available. The most commonly used materials are yellow brass and German (nickel) silver. Other choices are: iron, stainless steel, Damascus steel, mokume, (layered copper) and sterling silver. Yellow brass will oxidize quickly and tarnish; German silver will hold its luster much longer. Both can be polished to a fine luster finish and repolished when tarnished. Readymade oval guards are available from suppliers but you can make your own without too much trouble.
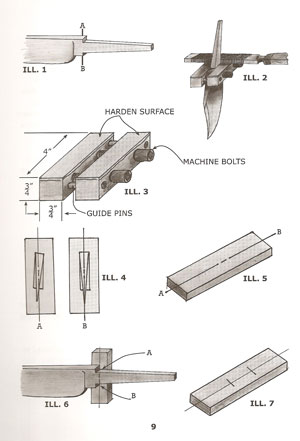
Before a guard and butt cap can be fitted to your blade, you must prepare the back side of the ricasso. This procedure should be performed prior to heat treating to assure that the metal is soft enough to file on. It is imperative that the line A – B be a straight line. See Illustration 1(below). This procedure is done using a filing jig. See Illustration 2. The jig is available from some suppliers (See Resources List), or you can make one. See Illustration 3.
The tang should be forged with a slight taper, then finish ground, to allow proper fit as the guard comes up from the back of the tang to meet the ricasso. When the tang and ricasso are properly “squared up,†you can move on to make the guard.
Depending on the size of the knife the thickness of the guard can vary from 1/8 to 3/16 to 1/4 in. The guard should sit square and true to the blade. See Illustration 4 A and B (above). Cut a rectangular piece of guard stock from your metal base. The piece should be a little larger in size both in width and in length than the finished guard will be. Apply layout dye or Magic Marker ink to one side. Scribe a light center line through the center of the base metal. See Illustration 5. Position the guard stock under the tang lined up on the ricasso. See Illustration 6. Scribe a mark at points A and B with equal amounts of guard stock above and below the ricasso. (On a Bowie knife with a 9 inch blade the guard length would be 2 ¾ to 3 in.) Square off points A and B to the center line. See Illustration 7.
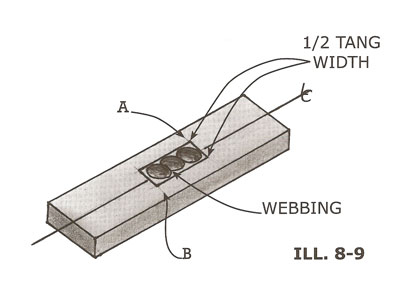
Measure the thickness of the tang at its juncture with the ricasso. Set off half the distance on either side of the centerline. Scribe two parallel lines, one on either side of the center line, and two lines perpendicular to the center line at A and at B. See Illustration 8 (below).
You will want to remove only enough metal between the guidelines to assure a tight fit square to the tang and ricasso. It is necessary to center punch before drilling holes in metal to insure that the finished hole is located properly. If you do not center punch the hole before drilling, it will probably be out of alignment when drilled. Center punch the holes to be drilled at equal distance apart on the center line. After drilling, the holes should appear as in Illustration 9. The preferred method for drilling holes is “Step Drilling’. Step drilling means to first drill a small hole then enlarge it using a larger bit, continuing to use larger bits until you have reached the proper diameter hole.
(The next chapter in the book “Handles and Guards†is “Two Methods of Fitting and Securing the Guardâ€Â)
Joseph F. Keeslar, Master Smith
Dan Cassidy
Journeyman Smith
Send an email to Dan

I picked up a copy of Joe's book when I was at the ABS weekend seminar in Maine last summer. Somehow it got lost between there and getting off the plane back home in Hawaii. I went to the airline for days asking if it had been found, but no luck. Maybe I'll pick up another one again someday. Until then, it's nice to be able to refer to this thread. Thanks for posting!
I had the good fortune to take Joe's' Handle's and Guards class at the ABS school in Arkansas. If you get the chance take the class, cuts the learning curve way down.....Don
|quoted:
I had the good fortune to take Joe's' Handle's and Guards class at the ABS school in Arkansas. If you get the chance take the class, cuts the learning curve way down.....Don
I hope they have the class thatss scheduled this year. I took my annual leave for the class. I hope they have enough students for the class.. Ill be there. I need to try an meet Joe. He lives about an hour and a half from me. Not sure he'd like a Tennessee Trooper pulling up in his driveway though, we have a bad name in Kentucky...lol
Mike
Michael Arguello
Apprentice Smith


