The Topic of the Month for November 2016 is, Hidden Tang and Mortised Tang Construction
We recently had a question on the Forum, regarding how to make a hole in a wood block for a hidden tang. It was suggested that this would be a good Topic of the Month subject. We already covered this topic in November of 2013. However, I checked the 2013 thread and feel that there is more to add. Perhaps new techniques, new shop photos and new construction methods. So exactly two years later, we’ll circle back to this important subject and have another go at it.
Please share your methods on creating hidden tang handles, where a hole is made in the handle material for a hidden tang. Or, your methods for making a mortised tang handle.
I attempted to merge the original Nov. 2013 Topic of the Month and the recent thread into this new thread. Didn't go so well. <img src=' http://www.americanbladesmith.com/ipboard/public/style_emoticons//blink.gi f' class='bbc_emoticon' alt=':blink:' /> I did the operation backwards. So, I've included this introductory comment at the start of Brion's original topic thread.
Steve Culver
--------------------------------------------------------------------------------------------
Note
To skip ahead to the beginning of the latest discussions for November 2016, click: November 2016 beginning
Dan Cassidy
ABS Forum Administrator
---------------------------------------------------------------------------------------------
Hello everyone. The topic for November is hidden tang handles. What methods do you all use for your hidden tang knives? Or mortised tang knives? Things like how you do layout on your handle material? Do you finish the guard before or after, or somewhere in between? How do you make the slot? Also pin placement and drilling holes.
So lets see the methods you use. Looking forward to it.
Brion
Brion Tomberlin
Anvil Top Custom Knives
ABS Mastersmith
Alright, I'll be first to jump in here. Typically I will finish the guard before starting with the handle block. Since I don't own a milling machine, I will slot the guard with a pair of drilled holes and cut between with a cut-off wheel on my dremel and finish with hand files. Not very time expedient but viable.
Usually with the handle block I will drill a pair of holes of the desired size on either end of the needed slot followed by one of a larger size in the middle and finish the slot with a scraper or rat tailed file. (The center line for these holes is drawn on the side of the block and aligned with the side of the drill press vise.) Since I don't do take-downs, I will fill the slot with AcraGlas when assembling the handle for a moisture barrier to insure no future corrosion within the handle. The exception to this would for a stag handle where I remove all pith in the center of the stag with the drill press and once again fill with AcraGlas when assembling.
Typically I will MIG weld a piece of 10/24 allthread to the end of the tang for the drilled & tapped butt cap or pommel nut.
For pin placement I will usually use one 3/32" pin centered on either side of the handle slot.
[Frame tangs are a whole different ball game.]
Gary
I can see no reason for the first drop of epoxy or things like JB Weld, etc., until the knife is completely done.
And then use an epoxy like West System that cleans up with denatured alcohol, so none of the components are disturbed.
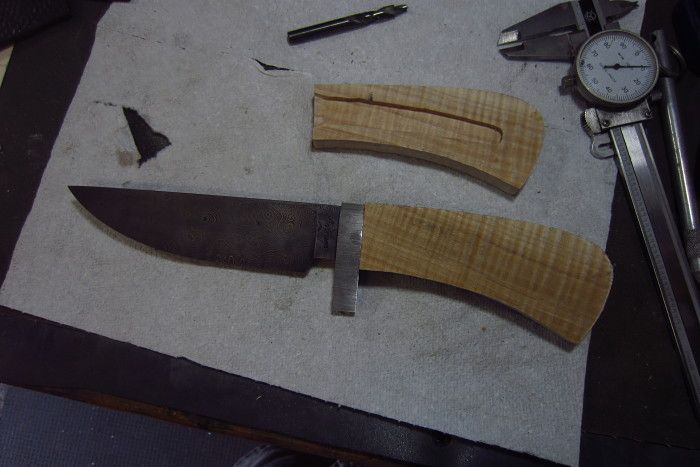
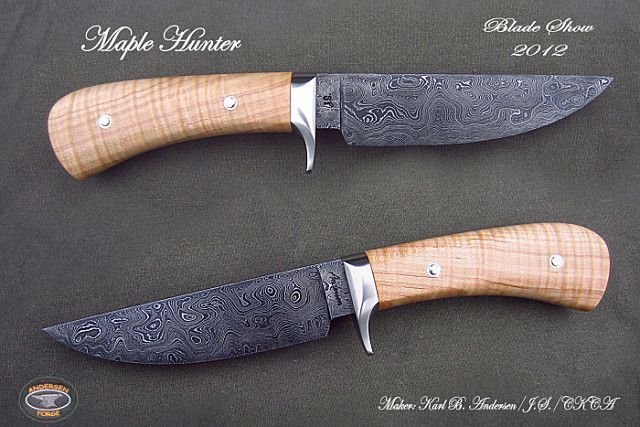
Here's a Damascus hunter with a mortised handle knife and stainless guard.
I'll fit the guard material and a rough handle placement and determine pin location:
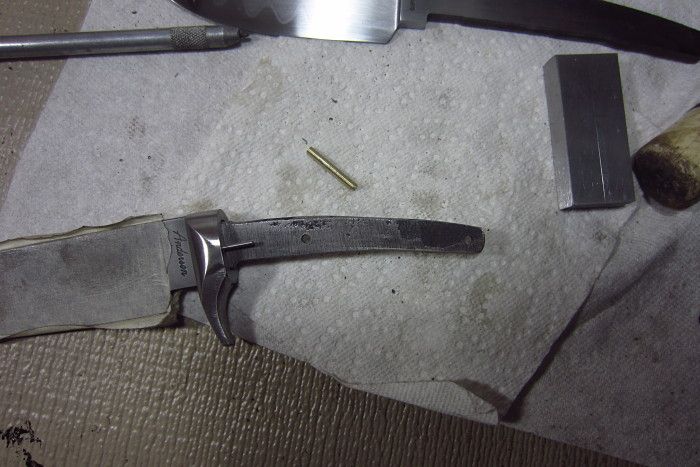
I'll get the guard shaped and the two handle pieces epoxied together and pinned to the guard:
I will then finish the guard completely, independently of the knife.
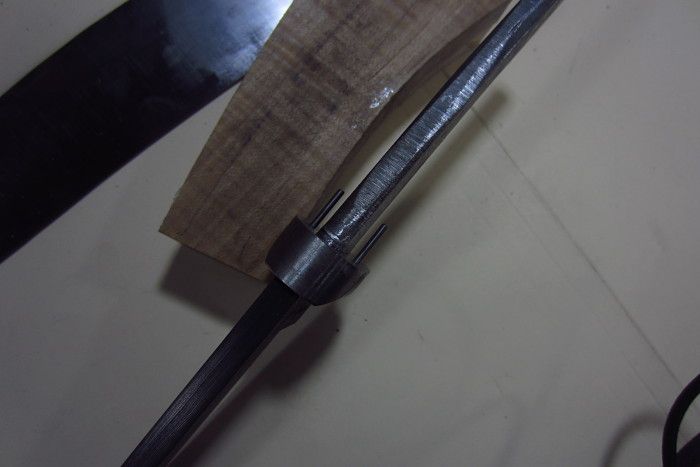
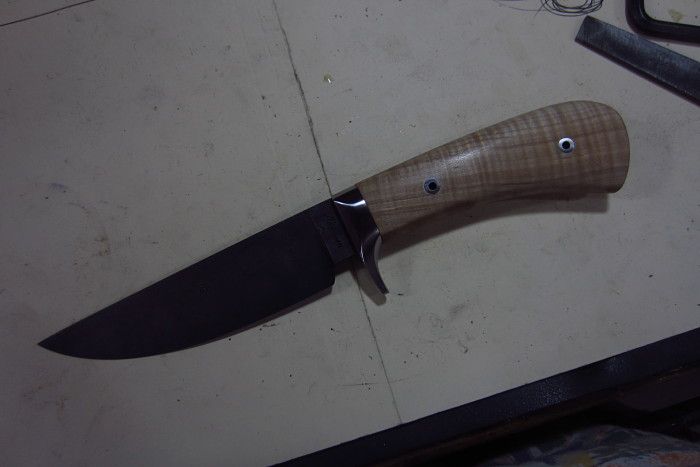
With the handle pins drilled and the handle pinned to the guard and slid together, I'll shape the handle to its completely finished condition:
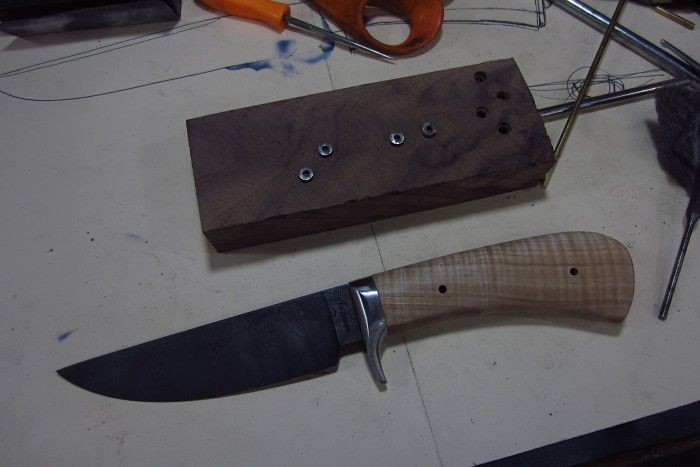
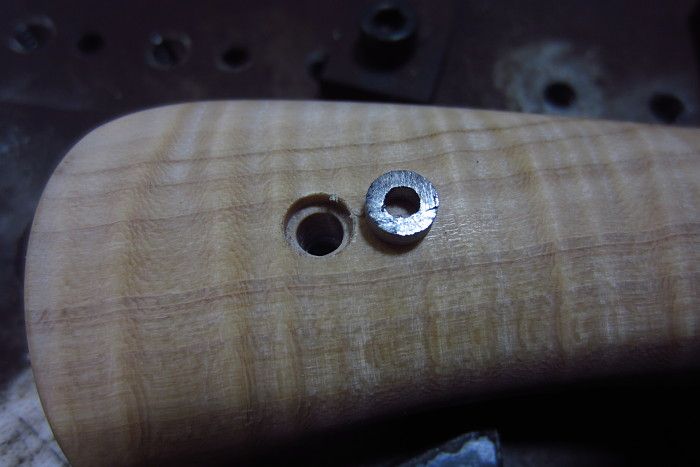
Then, I do something a bit different with my assembly pins. So as not to place lateral stress on the handle material when peening the pins, I drill 1/8 inch thick "washers" and place them in the holes.
When I peen the pins, I still get the same holding power of the mushroomed head without cracking or stressing the handle material.
File and sand smooth with handle:
At this point, the knife is completely done except for peening the pins.
I remove the guard and load up the knife with epoxy.
Put all components back together and peen the pins.
While the epoxy is still semi-liquid, wipe off the excess "squeeze" with alcohol.
This way I can remain in utter control over each piece until the very end.
No worries about marring any one surface and not being able to fix it, etc.
Karl B. Andersen
Journeyman Smith
Hello Karl,
Thank you for your contribution. I especially like the use of the washers. I assume that you own a lathe and make the washers from round stock? I am not sure I understand "With the handle pins drilled and the handle pinned to the guard and slid together, I'll shape the handle to its completely finished condition". Does this mean that the only thing missing is the blade? I am also curious if you use a holding fixture to finish your handles. Would you be willing to post a picture of the midline where the slabs are glued?
Your approach makes sense to me and is much easier than trying to drill, scrape and fit.
Thank you,
Robert
Robert, I will put temporary pins in the lateral pin holes to shape and completely finish the handle. This is done while everything is attached and connected.
Then I'll take it apart and 100% finish the guard while off of the knife.
The alignment pins from the guard to the handle material allow me to do this and return to that location with no change in location.
On this knife, when it was completely done, I slid the knife apart, put Tung oil on the handle and while that was drying overnight I hot-blued the Damascus blade.
I use a small mill to mill the inside handle surfaces. I don't think I have any pictures of the spine view. The joint between the two pieces is virtually unobservable.
And I do use a lathe to drill a hole in round stock for the washers.
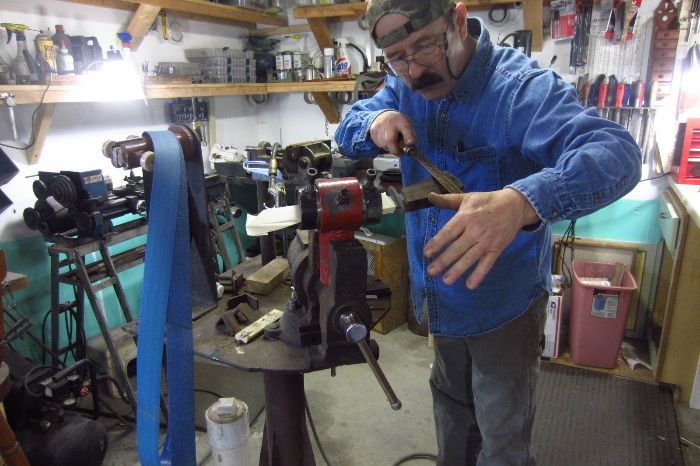
I do use a simple knife vise mounted in a vise I have mounted on a pedestal in the middle of the room.
This allows me to access the knife from any direction under the sun.
Karl B. Andersen
Journeyman Smith
Karl,
Great post with pictures and techniques that will be helpful. Got some questions for you.
Do you use West to glue up the two sides, or something like Titebond?
How do you keep the temporary pins in place while shaping the handle?
Do you drill the pin holes inside out, one side at a time, after drilling the holes in the tang?
The washers look great and add to the pins. Very nice!
Thanks for sharing!
Bob
West system is what I use on everything.
It cleans up with alcohol. Too easy.
I drill one side of the material from the inside out.
Epoxy the two pieces together using the tang to align the pieces.
Let cure.
Then use the holes on one side to drill through to the other side.
Keep in mind that I have the handle material pinned to the guard. That helps a lot in keeping things from flopping around.
I just let the temporary pins sort of "float" while shaping the handle.
Karl B. Andersen
Journeyman Smith
Thanks Karl,
I'm going to give your method a try on my next hidden tang. I built a small boat using the West System many years ago. Good stuff!
Now, if someone would do a video on shaping a guard:-) It would make a great addition to the YouTube channel.
Thanks Again,
Bob
Karl,
Thanks for the info and great pics. I do have one question.
How do you keep your shop so clean & tidy? Mine looks like a bomb went off in it....
I like to blame that on the fact that I share it with my wife.
Joshua States
www.dosgatosforge.com
https://www.youtube.com/channel/UCdJMFMqnbLYqv965xd64vYg
https://www.facebook.com/dos.gatos.71
Also on Instagram and Facebook as J.States Bladesmith
“So I'm lightin' out for the territory, ahead of the scared and the weak and the mean spirited, because Aunt Sally is fixin’ to adopt me and civilize me, and I can't stand it. I've been there before.â€
Quote from Karl Andersen:
"I just let the temporary pins sort of "float" while shaping the handle."
I like the good, solid techniques you showed us above in your pictorial Karl. I cant say anything that would be much better than what's been stated, but I want to emphasize Karl's point about installing temporary pins. There might be a number of reasons why a newer maker needs to study this trick. Being able to assemble and disassemble a knife during it's shaping will allow for the inclusion of file work, etching of Damascus parts, etc. It opens up another level of design and options that would not otherwise be possible.
That's how I keep it clean - I don't have a wife! <img src=' http://www.americanbladesmith.com/ipboard/public/style_emoticons//laugh.gi f' class='bbc_emoticon' alt=':lol:' />
|quoted:
Karl,
Thanks for the info and great pics. I do have one question.
How do you keep your shop so clean & tidy? Mine looks like a bomb went off in it....
I like to blame that on the fact that I share it with my wife.
Karl B. Andersen
Journeyman Smith
ABS YouTube Channel Video - Making the Guard and Handle for a hidden tang twisted multi bar Damascus Blade
by Manuel Quiroga Güiraldes
This ABS YouTube video is part 2 of 2 covering the making of the guard and handle for a hidden tang forged blade with a twisted multi bar Damascus pattern in a complete step by step Work in Progress demonstrated by ABS Apprentice Smith Manuel Quiroga Güiraldes of Buenos Aires, Argentina.
Thank you Manuel for sharing!
[media] http://www.youtube.c...h?v=2A0NZU29S_0 [/media]
Dan Cassidy
Journeyman Smith
Send an email to Dan

That video should be very helpful to many people.
Up to the point of shaping the handle, I go through virtually the exact same steps.
(Now I don't have to make a movie!) <img src=' http://www.americanbladesmith.com/ipboard/public/style_emoticons//wink.gi f' class='bbc_emoticon' alt=';)' />
Karl B. Andersen
Journeyman Smith
Watched the video, very helpful. I've been doing some of the steps.
What is the jig he put on the handle when peining the last side? Looks like a piece of leather, maybe, to keep from messing up the handle.
Karl, you can still get in the movies. How about a video or pictorial on shaping a high/low or S guard. I've searched the web and can't seem to come up with anything really helpful.
Thanks to everyone that shares all this knowledge,
Bob
|quoted:
Quote from Karl Andersen:
"I just let the temporary pins sort of "float" while shaping the handle."
I like the good, solid techniques you showed us above in your pictorial Karl. I cant say anything that would be much better than what's been stated, but I want to emphasize Karl's point about installing temporary pins. There might be a number of reasons why a newer maker needs to study this trick. Being able to assemble and disassemble a knife during it's shaping will allow for the inclusion of file work, etching of Damascus parts, etc. It opens up another level of design and options that would not otherwise be possible.
Temporary pins are absolutely necessary in more complex handle designs. I use brass because it's cheaper and doesn't seem to get as hot as SS or NiSi when shaping the handles. I am getting very fond of frame handle designs and have to take that knife apart and put it back together so many times during construction I loose track. Now if I could find a really fast & easy way to sand the final pins down flush after the glue-up I'd be all set.
Joshua States
www.dosgatosforge.com
https://www.youtube.com/channel/UCdJMFMqnbLYqv965xd64vYg
https://www.facebook.com/dos.gatos.71
Also on Instagram and Facebook as J.States Bladesmith
“So I'm lightin' out for the territory, ahead of the scared and the weak and the mean spirited, because Aunt Sally is fixin’ to adopt me and civilize me, and I can't stand it. I've been there before.â€


