If you are grinding the handle with guard/spacer on the belt, make sure you have the platen in place for most of the shaping. Do not use the slack belt until the final smoothing as it tends to round off corners. When you say "The challenge for me with working the handle, guard and spacer off the blade is really true measurements on top, bottom and sides." I assume you are talking about symmetry and equidistance from center.
The next operation has a series of photos in my WIP thread "My Latest Adventure" My link
Now, if you are just shaping a spacer to the handle and will fit the guard later, super glue a piece of white paper to the face and cut out the slot hole. If you are shaping the guard (mostly) with the handle and spacer, glue the paper to the guard face and cut out the slot hole. Pin whatever parts you are working with to the handle and insert the blade. Using a series of fatter shims laid against the blade face, draw lines on the paper parallel to the blade. Mark the top of the blade and the bottom of the ricasso. for reference. Remove the blade and screw the whole thing together with the DW screw as in the post above. Take the profile down to where you want it with a little bit more to take off in the hand sanding. Profile down to 220 or 320 grit finish. This I do on the belt grinder with the platen in place.
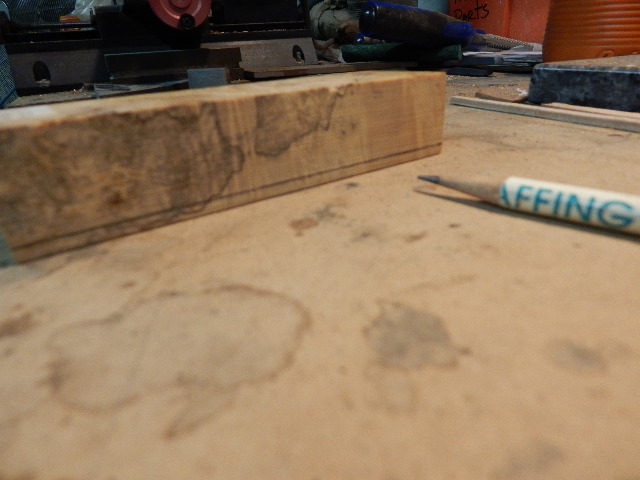
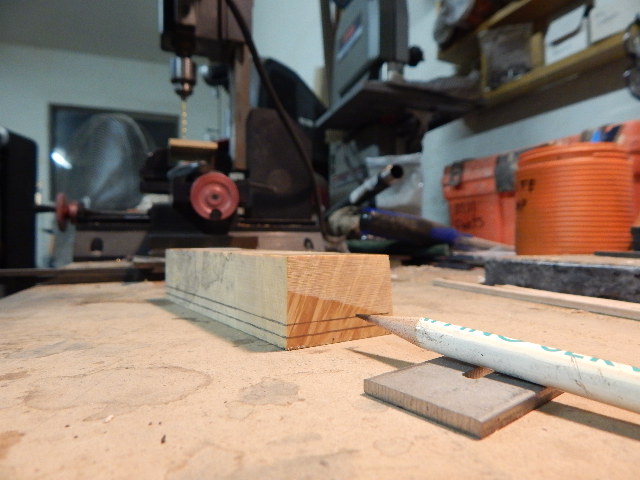
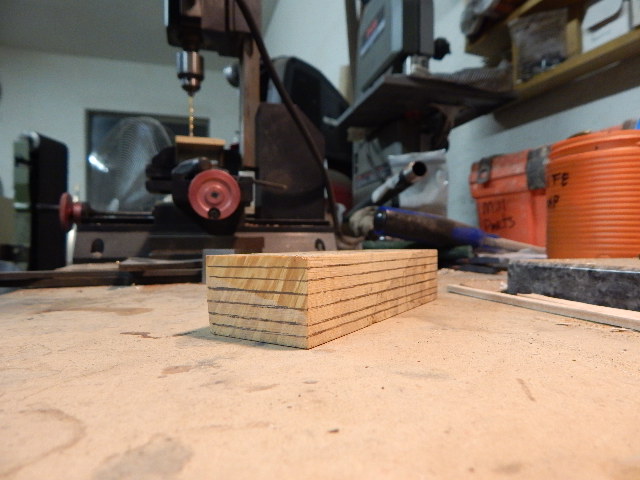
Next is marking the handle material. While the sides are still flat and parallel, (and the profile is almost done) I run a series of pencil lines around the perimeter. I lay the block and a pencil on a flat surface and run the block across the pencil point (or the pencil around the block) put a shim under the pencil and repeat. Keep adding shims until you are just shy of center, flip the block over and repeat from the other side. You get a series of reference lines for shaping the sides to center.
Put the reference lines on the entire perimeter of the handle material.
You now have reference lines on the spacer or guard face to see the symmetry develop and where you need to take more off. You have similar lines on the heel, spine and belly of the handle. You start by shaping the sides only. Use the reference lines to judge equidistance and symmetry. I do all of this on the disc and get the sides shaped and contoured leaving the profile finish for last. If you are using the belt, I would suggest grinding vertically with the guard upward. (a disc is better)
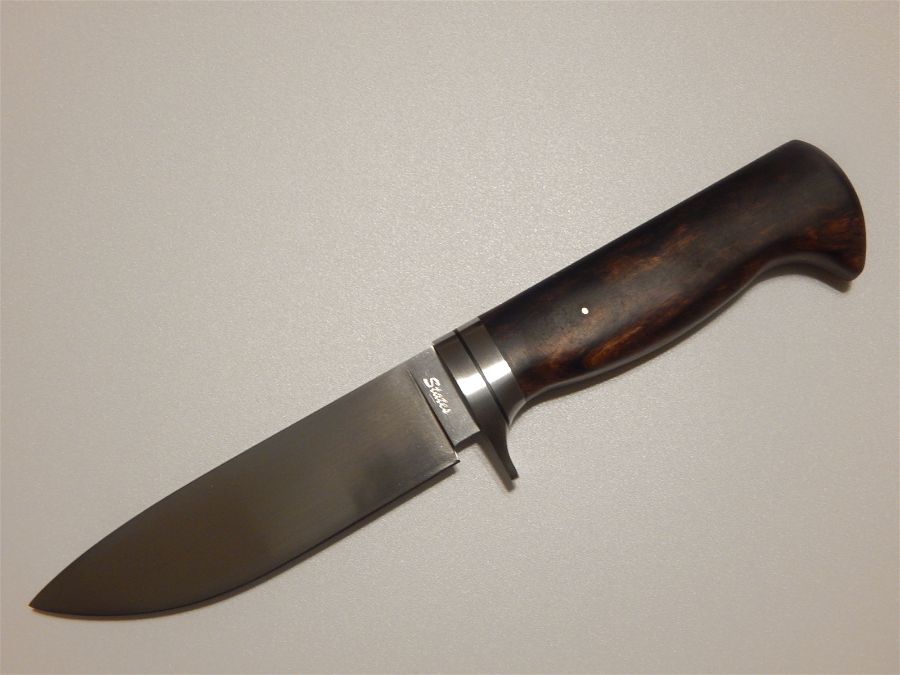
When I make a knife in this fashion, I always do the handle and spacer package without the guard. Then I come back and assemble the knife with some layout dye (or black Sharpie ink) on the back side of my guard. I scribe the spacer on the back side of the guard and shape the guard separately to the scribed line. I do the super glue and paper trick on the face of the guard so I can make the branch symmetrical and centered on the blade. My guards are always a little proud of the spacer because I only grind down to the line and not past it. A little hand sanding and shoe-shine on the edges makes for a comfortable transition. Unless I am making a knife like this one.
This was shaped almost entirely off the knife as a whole using hand tools and a little slack belt work.
Joshua States
www.dosgatosforge.com
https://www.youtube.com/channel/UCdJMFMqnbLYqv965xd64vYg
https://www.facebook.com/dos.gatos.71
Also on Instagram and Facebook as J.States Bladesmith
“So I'm lightin' out for the territory, ahead of the scared and the weak and the mean spirited, because Aunt Sally is fixin’ to adopt me and civilize me, and I can't stand it. I've been there before.â€
I like that drywall screw idea. Good thinkin'.
Karl B. Andersen
Journeyman Smith
Thanks Josh,
I will add that to my skill set
Any tips on fitting a double guard that is pointed in the center of the Ricasso? Do you keep you shoulders square on the ricasso and mill out curved section for the fit?
|quoted:
Any tips on fitting a double guard that is pointed in the center of the Ricasso? Do you keep you shoulders square on the ricasso and mill out curved section for the fit?
I do not understand the question. I'm having trouble visualizing what you mean. Can you draw something that shows what you are trying to do?
Joshua States
www.dosgatosforge.com
https://www.youtube.com/channel/UCdJMFMqnbLYqv965xd64vYg
https://www.facebook.com/dos.gatos.71
Also on Instagram and Facebook as J.States Bladesmith
“So I'm lightin' out for the territory, ahead of the scared and the weak and the mean spirited, because Aunt Sally is fixin’ to adopt me and civilize me, and I can't stand it. I've been there before.â€
|quoted:
Any tips on fitting a double guard that is pointed in the center of the Ricasso? Do you keep you shoulders square on the ricasso and mill out curved section for the fit?
I think i see what you are talking about. there are a couple of ways to do this, cleanly. the tightest fit is to set a slight taper to the tang (0.010 over the length or so) shape the top of the guard then mill or file a slot to fit. only the two spots interacting with the shoulders of the tang need to be flat and they can be carefully inset with a file. the second method is to mill a pocket to fit the ricasso into, this can look clean as long as the fit is even and centered around the pocket.
on swords where the fit here should not be as tight I make a drift the shape of the tang and hot forge a pocket the shape of the blade and tang shoulders. this can get a surprisingly tight fit if you are careful and make the drift a little undersized.
MP
Thanks for the information Matthew and sorry for the terrible description on my question. I think the first method you mentioned would be best for me to try as it basically a press fit with a pointed guard and square shoulders on the Ricasso. You would also be able to radius the shoulders of the Ricasso to match the curve of the guard if needed. Thanks again.Barry
|quoted:
I fit my guards pretty well as Brion and Ed has described. Maybe a mix with a little of my own preferences. The file guide is a fine tool if well made and well cared for. I also use a very strong guard press to seek the tightest fit within reason to insure that it is a mechanical fit, not relying on glue or sealant except for just that, a sealant.
In my opinion, tight joints on a hidden tang knife, are the real strength of the knife. There is an argument by , in my opinion, often made by inexperienced makers and buyers, that a full tang knife is stronger than a hidden tang. I don't agree with that. I do concede that a full tang BLADE is likely stronger in a side by side flex/bend test. However after adding the handle components properly and with tight joints, I see the possibility of the hidden tange being actually stronger as a complete knife depending on materials. That a hidden tang knife is strong has been proven time and again in Master Smith Performance Tests, the knives being hidden tang as required by the rules of testing. A lot of knives used by makers in cutting competitions are hidden tang also lending evidence that they are strong and tough. The fact that some of these proven and tested knives are take down in construction means that hidden tang knives, when well fit and using suitable materials, proves where the real strength lies. Tight joints. Mastery over the tools and techniques used to achieve tight joinery will take the knife maker from a beginner to a skilled knife maker.
Just wondering if you had a picture of your guard press that you could share with us.
Thanks Kindly
Jim Clow
Barry, I believe your description of the way it's done is correct. Ben Seward does a lot this way. As Joshua said, a sketch will help. It might help others as well who cant visualize it.
|quoted:
If a person can sit through my first two or three videos on a knife build, I go through a live-time knife assembly showing guard fit in detail:
Karl,
I want to thank you for these (and all) videos. I've been following you on YouTube for some time and was just watching these videos this morning (at work while I was working on boring paperwork).
Drew
How do you attach the guard?
Most Bladesmiths/Knifemakers develop their own techniques over the years, but for me, it all begins at the forge. I often hear/read about how the ricasso area(s) on a blade "must be flat and parallel. I simply do not subscribe to that. I forge in a distal taper in nearly all blades, which makes the end products look like an elongated diamond when looking down at the spine. The thickest part of the blade is at the middle of the ricasso.... tapering from there rearward, and again forward to the blade's tip. This aids greatly in a tight fitting guard.... the tang. http://www.legacystudioproductions.net/knifemakertraining/
Would Master Caffrey’s technique using a non-parallel faced ricasso be a problem in a current day JS presentation test?
I used the technique for both my JS and MS tests. The key is to DO IT WELL, meaning making the apex of that angles as even and equal side to side as possible..... and blend the apex of the angles (I do this when hand sanding/finishing a blade). If done correctly, the only way you can tell the ricasso is not flat..... is with a micrometer. And there are no tools, beyond the judges eyes, skills, and experience used for judging.
Those were years ago, but just within the past couple of years I have had students, whom I taught the technique to, who have passed the JS test.
Ed Caffrey, ABS MS
"The Montana Bladesmith"
www.CaffreyKnives.net
Thanks for the quick reply!
I've been researching guards and handles, and this thread was helpful. Especially the videos that Mr. Andersen linked. I watched the entire series.


