
good day all,
big step for me today !! LOL !!
after reading and reading and some more reading......my first attempt with 5160 .....a bowie style with a false edge......I know real original !! LOL !
I have to try one !! we just don't see them up in here in my neck of the woods , mainly hunters. Bowies and fighters just aren't that popular around here
for some reason so after viewing so many amazing pieces on here I have to give one a wirl......
my questions is at what point do you do you prefer to add your false edge ? is there a right or wrong time ?....before heat treat ? after heat treat ?
just looking on opinion and preference, do you prefer to handfile them in , wheel , platen ? I realize there are many ways to skin a cat just curious
and interested......thanks , Rob
back to the forums and wip's to see if I can find...in the meantime thank you your help !!
[font="Comic Sans MS"]'Never Quit On Improving'[/font]

Well, I don't claim my way is right or wrong, just that it's how I was taught. For better or worse, I do mine when I'm refining the profile before hardening and tempering. Just used the round wheel on my belt grinder and lightly feathered it into the center of the spine.
Good luck with yours!

Hello Rob. I have seen it done both before and after heat treat. I do it both ways. It is easier to do the clip before heat treat. You can use a file to do it or grind and clean up with a file. If the clip is ground after heat treat I use diamond files to clean up. One thing to watch is to get the clip even before heat treat. If you do not it can lead to warping. I usually start with the grinder on low speed and a fresh belt, get the clip close, and finish with a file. This is before heat treating. I should also say I get the blade to 120 grit rough ground, then do the clip, then heat treat. Just make sure to lay it out well and take your time. Now there are some blades like certain Japanese styles and blades with hamons where I do the clip post heat treat. That is just my way.
Brion
Brion Tomberlin
Anvil Top Custom Knives
ABS Mastersmith
thank you Brion , appreciate your reply......
[font="Comic Sans MS"]'Never Quit On Improving'[/font]
thanks Michael
[font="Comic Sans MS"]'Never Quit On Improving'[/font]

I do mine before hardening.
Gently remove most of the material on the grinder with whatever attachment suits the profile of the clip.
I then refine the false edge by draw filing in the knife vise.
I draw file to a scribed line which was made on a surface plate and height gauge.
First with a bastard file and follow up with a single cut file.
Then hard backing with 220 to make it sweet and pretty. <img src=' http://www.americanbladesmith.com/ipboard/public/style_emoticons//tongue.gi f' class='bbc_emoticon' alt=':P' />
Karl B. Andersen
Journeyman Smith

Rob,
You might want to check out the clip grinding attachment under jigs and fixtures on MS, Steve Culver's web page. Pretty simple to construct, and works great! He has posted step by step instructions with photos and materials list.
Bob
|quoted:
I do mine before hardening.
Gently remove most of the material on the grinder with whatever attachment suits the profile of the clip.
I then refine the false edge by draw filing in the knife vise.
I draw file to a scribed line which was made on a surface plate and height gauge.
First with a bastard file and follow up with a single cut file.
Then hard backing with 220 to make it sweet and pretty. <img src=' http://www.americanbladesmith.com/ipboard/public/style_emoticons//tongue.gi f' class='bbc_emoticon' alt=':P' />
Thanks Karl , good info there.....
|quoted:
Rob,
You might want to check out the clip grinding attachment under jigs and fixtures on MS, Steve Culver's web page. Pretty simple to construct, and works great! He has posted step by step instructions with photos and materials list.
Bob
good stuff thanks Bob I will definitely check out Steve's jig build !
[font="Comic Sans MS"]'Never Quit On Improving'[/font]
|quoted:
I do mine before hardening.
Gently remove most of the material on the grinder with whatever attachment suits the profile of the clip.
I then refine the false edge by draw filing in the knife vise.
I draw file to a scribed line which was made on a surface plate and height gauge.
First with a bastard file and follow up with a single cut file.
Then hard backing with 220 to make it sweet and pretty. <img src=' http://www.americanbladesmith.com/ipboard/public/style_emoticons//tongue.gi f' class='bbc_emoticon' alt=':P' />
|quoted:
Rob,
You might want to check out the clip grinding attachment under jigs and fixtures on MS, Steve Culver's web page. Pretty simple to construct, and works great! He has posted step by step instructions with photos and materials list.
Bob
Thanks Karl , good good info there and thanks Bob I will definitely check out Steve's jig build !
I'll post a few pics here for critique, sorry for not so good pics
here's a few to get the knife started......


[font="Comic Sans MS"]'Never Quit On Improving'[/font]
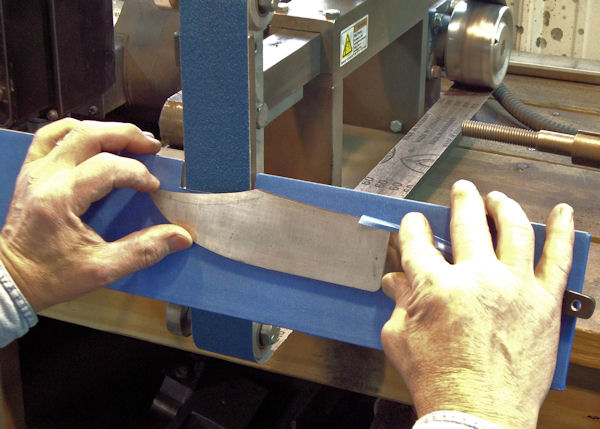
Here is a little visual assistance on my process.
The ground blade:

I have used a French curve to determine where I want my false edge on the clipped blade:

In the above photo, you can also see how I have 60 grit grind lines running crossways against the blade. Colored with lay out dye, and then center scribed.
Even though the blade has distal taper, I have used a height gauge on my surface plate to create a center line.
I have then locked the blade in my knife vise and turned the blade so that my false edge plane is parallel to the floor to generate more ease in draw filing.

Here is the rough filed blade:

Then clean up with 220 and a hard steel back:


Karl B. Andersen
Journeyman Smith

Karl B. Andersen
Journeyman Smith

Rob,
Looks like you have a good start on that blade!
I use my clip grinding attachment to shape all of my clips. This attachment works great for grinding the bevels on dog bone handles, as well as a variety of other uses.
Since I am able to use abrasive belts to grind the clip, I do the clip after heat treatment. Before I built this attachment, I used the same process as Brion and Karl, shaping the clip with grinding wheel and files before heat treatment.
Below is a photo of the attachment in use. You can find more photos and directions for building it on my web site. Clip Grinding Attachment
I would make some modifications to the attachment's construction, before I build another. The attachment as shown on my web site, has a limited range of adjustment. It works fine for nearly all clip grinding. But as I have found other uses for it, I would like for it to be able to adjust from 0 degrees to 90 degrees. So if you decide to build one, you might want to think about changing the method of adjustment.
Nice, Steve. I could see that taking some "acquaintance" time, but quite beneficial in the long run.
I'm getting a new grinder with an articulating tool rest and may need to build this attachment for it.
Thanks for the link!
Karl B. Andersen
Journeyman Smith
Good recommendation Steve! I made mine to go from 0°-90°. I had to adjust the slot length and placement of the angle iron so that the work rest would tilt to a full 90°. Just a little trial and error fitting. Works great, and highly recommend it for a smooth, even clip with the grinder!
Also, it can be made without a mill. Just drill and remove the webbing with hand work. I used a cylinder burr on my die grinder. Not as slick as a mill but it works.
Thanks,
Bob
