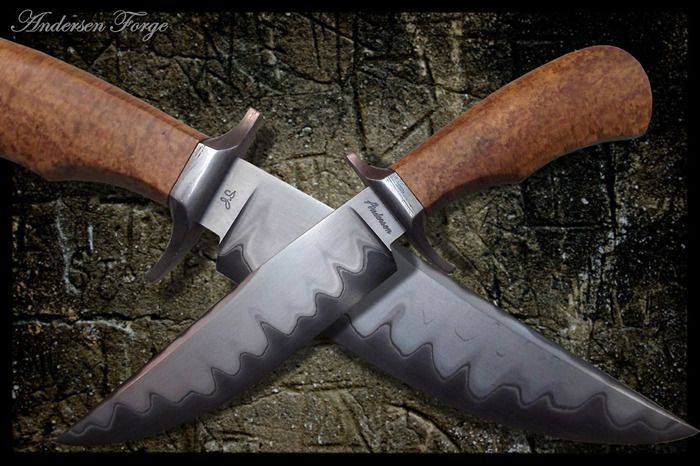
The Topic of the Month for January 2017 is, San Mai Blades. Please post your techniques and questions about making San Mai steel and creating blades from it.
I make a lot of San-mai.
My philosophy is to use as thick of pieces that I can find, as I want to spend as much time with the billet at welding and forging temp as possible.
This not only creates excellent alloy/carbon migration which displays nicely at the end, but also ensures full welding of the pieces.
This refers to when I am making carbon/stainless San-mai.
My center core is 3/8" thick 1095 and my jacket is normally about .270 410 stainless.
I use martensitic stainless so I can use the magnetic plate on my surface grinder to get all surfaces clean and smooth for a good weld.
I reduce the 7/8" billet with flat dies only about .050" per reduction.
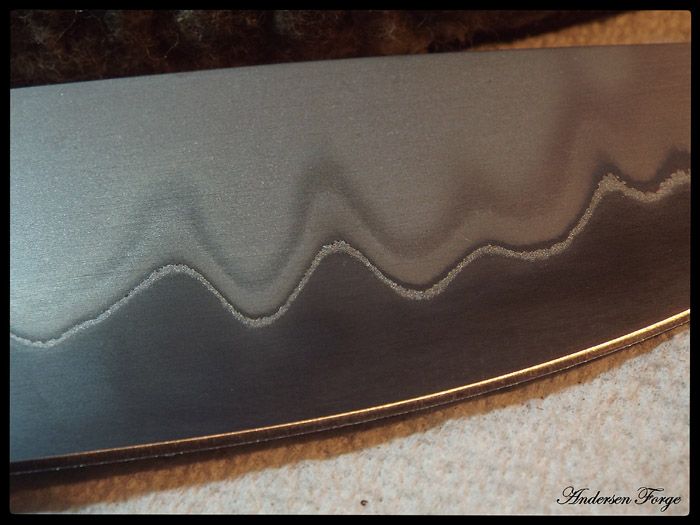
Nearing the end, I use the round drawing dies for one reduction to create a "ladder" in the billet which reveals itself as undulations along the transition zone.
I forge the knife on the edge to create the ricasso/choil and fully draw out the tang.
Many times guys say they do not forge on the edge for fear of delamination.
My response to that is that if they're afraid of delamination, then they can't justify selling that knife to a customer.
Karl B. Andersen
Journeyman Smith
Karl.... I was waiting for you to jump on this before I posted anything.....because I know you've made miles more then I have. <img src=' http://www.americanbladesmith.com/ipboard/public/style_emoticons//smile.gi f' class='bbc_emoticon' alt=':)' />
I have always wondered how you got such nice "scallops" at the transition.... now I understand.
Since you and I spoke about it, I've transitioned from using 416 to 410 for my laminate material... solves a lot of the issues I had with 416.
Something I've learned/discovered with this type of weld/billet is that the appearance of the finished blades differ greatly based on the welding technique used. When I do what I consider "screwing up", and allow a billet to soak for what I would normally think is too long when welding, I get a large, grainy boundary line of decarb....bad for cutting, but clients like the visual appeal more so then when I use what I consider "good" technique, and get a small, smooth transition line. I've tested both, and cannot discern any difference in the cutting ability, which brings up another point....
Since we're grinding at angles for the edge bevels, I believe that by the time we are down to a finished edge thickness, we've ground past decarb, which I'm sure is what produces that brilliant silver line in the transition zone on these type blades.
Personally, I generally start with only .125" laminates of 410, and a core material of about .100"..... I'm gona have to give the thicker laminates a try and see how I can manipulate them! <img src=' http://www.americanbladesmith.com/ipboard/public/style_emoticons//smile.gi f' class='bbc_emoticon' alt=':)' /> Here's an example of a mosaic core, with 410SS laminates:
So far we've only talked about the SS laminate variety of blades, but I'm sure there are many out there who will want to start with something a little less intimidating.....
Carbon/carbon/Carbon.... These would be a logical starting point for someone who wants to try the technique, and provide the best chances of success. For those who choose this route, just keep in mind that the transition(s) are not going to be nearly as dramatic in appearance as the SS laminates, but the success rate will be much higher.
Something that I've done a few of, is to build mosaic billets of the same pattern.... one with 1080/15N20, and the other with 1080/Pure Nickel, and use those as my laminate materials.... even with the same pattern, it creates a very bold visual effect:
I'm often asked the question... "How does a laminate blade perform compared to a blade of the core matierial?" The short answer.... No better, or no worse, provided the technique is good. The only differences are that with a laminate blade, there's a lot more work, and a lot more chances to mess it up! <img src=' http://www.americanbladesmith.com/ipboard/public/style_emoticons//smile.gi f' class='bbc_emoticon' alt=':)' />
Ed Caffrey, ABS MS
"The Montana Bladesmith"
www.CaffreyKnives.net
Yep - that shiny line is definitely 1095 - or whatever your core steel is - and after the carbon migrated to the carbon deficient stainless clad, it's now pretty much just raw iron.
Also notice that just above it is now a carbon rich layer, so it etches out blacker.
Agreed - there are so many different ways to forge this stuff, and different times and temps.
Of course, the longer it's held at higher temps you can get all sorts of transition zone display.
Or, exactly like you said, Ed, a rather plain and simple display, which more actually follows good forging practice!! So, to get 'pretty' San-mai, we sort of have to screw it up and then fix it with good post-forging thermal cycles. Which is incredibly important.
Also, if you have to do some sub-critical spherodized annealing so you can saw cut it, you can't forget to get all the carbon back into solution before hardening, so you'll need to do some controlled reducing heat thermal cycling as well.
There are lots more information to share on this.
Karl B. Andersen
Journeyman Smith
Karl / Ed
Thanks for the input.
What temps. do you weld at, about the same as damascus, or higher, on the stainless - carbon San Mai ?
Anthony
|quoted:
Karl / Ed
Thanks for the input.
What temps. do you weld at, about the same as damascus, or higher, on the stainless - carbon San Mai ?
Anthony
I do at about the same as regular Damascus welding, but remain at the higher heats a bit longer before I start reducing. I don't think it's necessary for the weld but it aides carbon and alloy migration which shows later in the etch.
Karl B. Andersen
Journeyman Smith
When I'm welding SS laminate, I dial the forge to 2370F, put the billet in, and once it reaches temp, allow it to soak for 7-10 minutes, but that's depending on the thickness of the laminates. For non-Stainless laminates, I use the same parameters as I do for making routine damascus billets.... around 2350F and just long enough exposure to weld.
When welding SS laminates, I think it's also important to mention that I find it necessary to use careful thermal treatments to ensure grain size reduction. After the thermal cycling, I generally place the material in my paragon, and soak at 1350F for 2 hours, then allow the material to cool down overnight with the oven....which is my annealing process for the SS laminates.
Ed Caffrey, ABS MS
"The Montana Bladesmith"
www.CaffreyKnives.net
Karl / Ed
Thank you for your detailed answer. The exact information I was looking for.
Thank you both.
Anthony
What are your opinions on using 420 for the stainless?
I have that.
To date I've only used 416 or 410. But since about the only difference with 420 is a couple more points of chromium, it should work. I would think you'd have to work out the welding process, and doubt it would draw out as well as 410, but you never know until you give it a go! <img src=' http://www.americanbladesmith.com/ipboard/public/style_emoticons//smile.gi f' class='bbc_emoticon' alt=':)' />
Ed Caffrey, ABS MS
"The Montana Bladesmith"
www.CaffreyKnives.net
I used a lot of 420 from Aldo a few years ago. I now use 410 I get on Ebay.
I don't notice any difference. I use the same procedure.
Karl B. Andersen
Journeyman Smith
Are you guys using flux or dry welding? Great looking stuff guys, the stainless laminate looks outstanding.
Stainless San-mai requires forge welding with no oxygen. All of the seams are often welded closed or placed in a container.
No flux can be used.
Karl B. Andersen
Journeyman Smith
G'day All
Great topic. I can only add some variations on the theme. The stag Bowie in the pic is 1095 and 410. I weld at the same temp as Damascus 2315 with no real extra soak time maybe 3 minutes or so. I also use thick billets for the same reason as Karl plus some a few others. One is just basic volume of material and efficiency. If I have to mig the edges the thing might as well be 3/4 inch thick as a quarter inch but I get three times as much material. One a big knife I can get a nice even heat on a 6inch billet plus weld it in one go on the press dies. After that it's all drawing dies on the hammer. I will forge to full shape but do cut the tip at 45 first. I'm not concerned with delamination (well I'm concerned I just don't get it unless i screw up and hit way too cold) but I have had the core twist out on the tip if I'm forging a wide bar, so i cut and then forge. I have to cut the mig weld off anyway...
I am curious about what issues you have had with 416 Ed. I have recently used some and i am having trouble with alloy banding in the stainless jacket. My thought was that in grain refining the 1095 the lower temps are causing alloy precipitation in the 416. Industry practice says not to normalise 416 so I'm putting two and two together and getting 3 and a half.
Karl have you encountered any alloy banding?
Cheers S
|quoted:
G'day All
Karl have you encountered any alloy banding?
Cheers S
Great to hear from you, Shawn!
No - I have encountered no alloy banding that I know of. Everything I witness is differing strata of migration.
The reason I quit using 416 was because of the added sulfur, which makes it machinable. On two occasions when I was forging down large round stock for fittings, I moved the material too far too fast and got hot-short cracks. The steel literally came apart. And when we consider it for a moment - it's supposed to! That's why it has the sulfur.
In an effort to stack the deck in my favor while making San-mai, I quit using 416 of any kind. Even 303 is the machine grade austenitic stainless and I would not use it for the same reason.
Karl B. Andersen
Journeyman Smith


