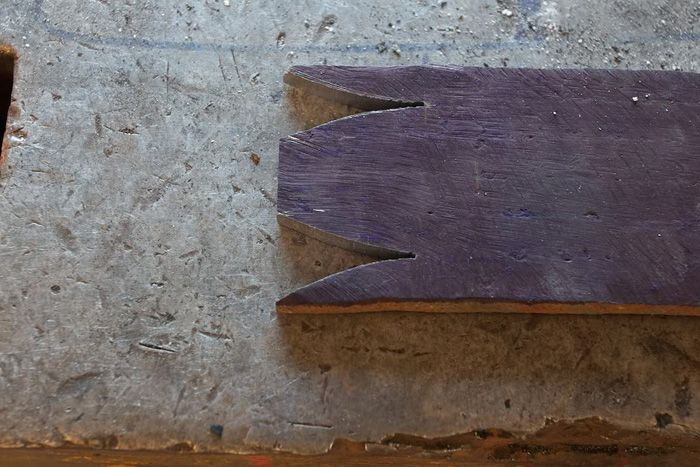
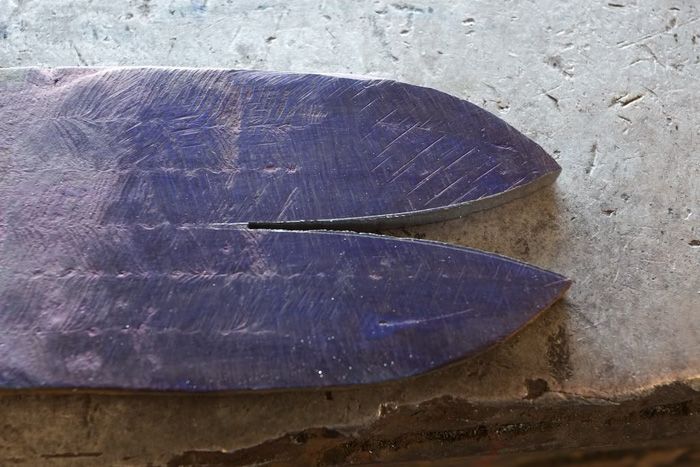
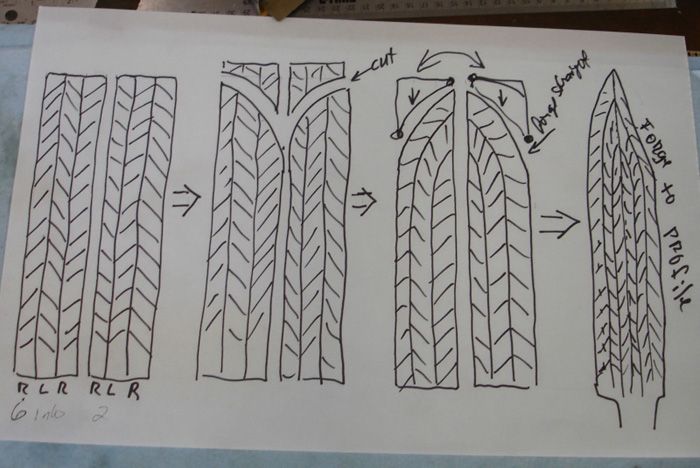
I usually will do 1/2, cut the end on the needed angle and forge it into a warncliff shape. Then do the other half the same and weld them together down the middle.
Gary
Karl, I saw John White do the same method. I do not really work with multi bar twists at the moment, but this seems like the most logical way.
Brion
Brion Tomberlin
Anvil Top Custom Knives
ABS Mastersmith
I have just made a simpler version of this and it worked fine for my purpose at the time. I do think that two stage operation is great and will try to keep in mind for another.
I will point out for any who have never made a multibar blade that the bar in the illustration is made of 6 individual bars allowing the saw cuts to be on a weld joint providing continuum after the end is welded closed. I'm just pointing out that the bar count affects the sawing and welding procedure.
Thanks for the input, gentlemen.
And I saw that, Lin.
Mine is a five bar, and I need to give my buddy J.R. another call. (It may not make any difference.)
Gary - when you have your "fish lips" open and are ready to tighten things up, do you attempt to heat, flux and weld all in one shebang, or do you close it in stages?
To further illustrate my question, I could see heating the billet and closing the opening most of the way before fluxing and then bringing up to welding heat, flux and then weld.
What's your take on this, Gary?
Karl B. Andersen
Journeyman Smith
|quoted:
Gary - when you have your "fish lips" open and are ready to tighten things up, do you attempt to heat, flux and weld all in one shebang, or do you close it in stages?
What's your take on this, Gary?
I have only done the method with the fish lips or bird's mouth a time or two and tightened everything up (at a forging temp and not a welding temp) before attempting to weld. With my method I will forge each half to the warncliff shape, grind clean both straight edges that will become the center of the finished billet and will tack weld the two halves on each end. The actual forge welding of the two halves usually takes two heats but then I always weld everything twice anyway. As far as the fluxing goes, I usually don't. For the past couple of years I have gone to more & more dry welding (in a reducing atmosphere) after grinding the surfaces clean and forging everything tight (at a forging temp before coming to a welding temp).
I hope that this all makes sense.
Gary
Thanks, Gary. Yes - it did make sense.
I'll soon find out how I skin this cat.
Karl B. Andersen
Journeyman Smith
If you want to preserve the pattern and maintain a consistent twist-rate throughout the blade, I think the above described methods are precisely what you want to do. Of course the blade's final profile is also critical factor in how it all comes out in the end. Some methods probably look better than others with, for example a long clip-point bowie, as opposed to a dagger or spear-point blade.
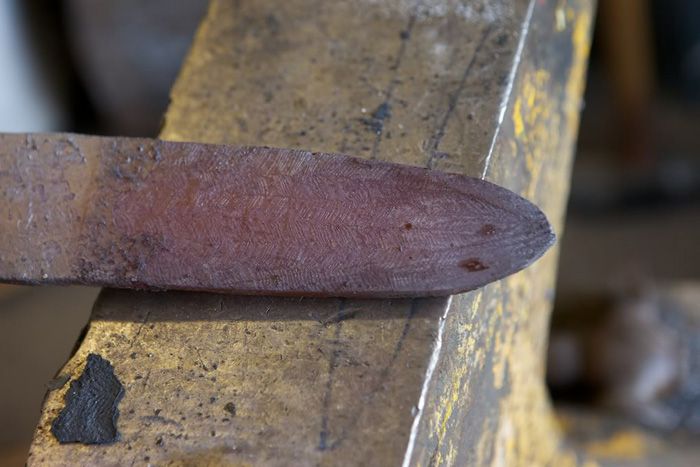
In my last multi-bar twist blade I took a different approach. It was going to be a clip-point bowie and I wanted a more organic look, where the pattern would flow into the blade tip as if it grew that way. As luck would have it I took a few photos along the way...
With the bars all welded together, I pinched the tip over the edge of my anvil...

While I did so I forged a nice smooth taper into the profile...

I then cut off the little nub at the end and and finished forging to shape...

Eventually forging the clip and the bevels as well (unfortunately I don't have a picture of the final forging).
Anyway, here's how it looked when completed. As you can see the pattern sort of dissipated and flowed gradually into the tip.

It's a much different look than the consistent, regular twist patterns that a lot of makers use, and like a lot of things it ultimately comes down to personal preference. But on this knife, with this profile, this layer count, and this twist rate, I thought it came out pretty good <img src=' http://www.americanbladesmith.com/ipboard/public/style_emoticons//smile.gi f' class='bbc_emoticon' alt=':)' />
when doing shapes that I want the pattern to follow the edge and run up out the back I will cut the tip at an angle around 45% then forge the tip shape and forge in the bevel. On swords/spears I pinch the pattern at the point and forge the tip round, then wrap the edge bar around the tip in a continuous piece then weld it up from tip back.
MP
I do want to thank everyone for your input and response to my question.
I'm going to use my own tip "formula" and we'll see how it turns out in the final blade.
There have been some really good points made here.
Karl B. Andersen
Journeyman Smith
|quoted:
I do want to thank everyone for your input and response to my question.
I'm going to use my own tip "formula" and we'll see how it turns out in the final blade.
There have been some really good points made here.
Hey Karl This is a great topic and looks like it could compile some good info. i have cut the end of the bar at an angle and then shaped a rounded inverse of the finished clip and forged it inside out, trying to not compact the outside bars and disturb the pattern. Lots of gentle heats. This was on on Bowie knives. Not sure if that makes sense. I have bird mouthed daggers with success. i brought it closed first trying not to scale it up to much, be careful at the very base of the cut to not form a pocket where the width of the cut has to be taken up. John White was a master at these( well like everything) His process was to pre shape the bars and weld in stages making sacrificial pieces on the outside of the bar that would make the preform into a rectangle so he could hit it. These pieces also meant the hammer blows wouldn't indent the pattern of the actual Damascus. Look forward to seeing the results.
Cheers
Shawn
|quoted:
'Bout time you showed up, Shawn. (Where ya' been?)
Anyway, I do think I know what you're saying about the one method JW used.
Is this what you had in mind?
(The two sacrificial pieces.....)
<img src=' http://www.americanbladesmith.com/ipboard/public/style_emoticons//smile.gi f' class='bbc_emoticon' alt=':)' /> Before you do this one make sure that the left half is RLR and the right half is LRL.
Gary
I did not see the whole demo, I only watched the twisting part. I thought I heard, I believe it was Jerry Rados doing the demo, say when he has a long billet of multi-bar twist, instead of cutting a length from it to make a blade he pinches off the bar to the length he wants with a round fuller. Then uses the pinched end for the tip as all the bars in the billet terminate at one point.
Steve
I think I talked to Jerry three times yesterday and he didn't mention that one!!
But I like it!
Great idea.
|quoted:
I did not see the whole demo, I only watched the twisting part. I thought I heard, I believe it was Jerry Rados doing the demo, say when he has a long billet of multi-bar twist, instead of cutting a length from it to make a blade he pinches off the bar to the length he wants with a round fuller. Then uses the pinched end for the tip as all the bars in the billet terminate at one point.
Steve
Karl B. Andersen
Journeyman Smith


