
Thought I might toss this in here, and maybe it should be placed in the Damascus forum as well.
I post this because I recently viewed an on-line tutorial of a well known smith who showed a billet he was making and it was described as a "30 layer billet". Yet in fact, it was only 30 "pieces".
The actual layer count of alternating alloy was only 21 layers.
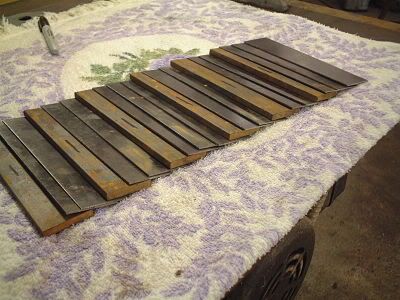
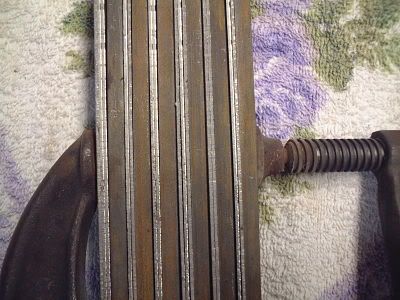
Here is a billet I'm about to weld up that is 20 pieces, but in fact is only 12 layers.
Not counted correctly, this could be a problem, especially for testing purposes.
Karl B. Andersen
Journeyman Smith

This is an important point in light of the test for sure.
One self imposed rule that I placed on myself as I was making my test knives was to go well over the minimum layer count. I did not want there to be any question of whether or not my blade had enough. In fact, on both my performance test knife and my Quillion Dagger, the layer count was over 400. I'm not suggesting everyone follow that, but one does get a little jumpy at times like that.
By the way, I am the guy Karl is speaking of, unless it happened again since. I was glad that he spoke up and asked me exactly how I was counting my layers. I was accurate in the count, but the net result did not show it as such, so I have since adjusted my way of expressing it or at least attempt to make it clearer. Lin
|quoted:
By the way, I am the guy Karl is speaking of,
Well, uh, nope, actually it wasn't you, Lin
I just saw the one I was referring to yesterday in another link.
I am glad, however, that this got a little attention.
I think this web site is the perfect opportunity for all of us to get on the same "page" with our testing, as well as other aspects of the ABS.
It will also allow new-comers a more available source of reference to get queries answered before they are perpetuated into a new smith's knife making career.
Thanks, Lin.
Karl B. Andersen
Journeyman Smith
Dang, I spoke up too quick!
Evidently this has been discussed by more than just us.
Brian, do you mind sharing some of your experience in developing your plan to test? Lin

Congrat's Brian!
The part that caught my attention in the video is how much your blade returned to it's original shape after bending it. I've seen a lot of videos posted on the web and not many return that closely to straight. Nice work!
May I ask what combination of steels you used for your test blade? I understand if you want to keep it close to your vest, so to speak.
Rick
Thanks Rick The steel mix is 15N20 and 1080. The main reason for this choice is that it is what I have already been using it for Damascus. I feel it is important to stick with what you are comfortable with. The make up of these 2 steels is very similar which is also a plus.
Lin I guess I started to answer your question with the info above. The steel mix aside, I made a blade with similar shape and dimensions as my JS test knife which I figured whould be a good starting point. My main focus was on the bend. Although every part of the test is important, the bend is what we do not do every day. So rather than focusing on how to make a knife that cuts well and then bend without breaking, I took the aproach of what allows a knife to bend without breaking and then what do I need to do to make it cut well and hold an edge.
I challenged myself to make a knife that would not only do well in the cutting portion of the test, but also not crack during the bend.
All of this took place over a very long period of time -- thinking and rethinking, calling upon things that I have been told by others, and calling upon my memory and notes of things that I have seen -- before I began forging any Damascus.
The first blade I made cut like a dream, but cracked half way on the bend when I got to about 75 degrees. The next one cut great as well, but cracked at about the same angle, but only about 1/3 of the way. After each test, I bent the blades back and forth until I broke them apart and examined under magnification what was going on and made adjustemnts for the next blade. The next blade did well in each part of the test and cracked just a bit right around 90 degrees so I knew I was close. I then forged 2 blades very close to the same and from the same billet. I heat treated them exactly the same and ran one of them through the test. It did very well and did not crack at 90 degrees, but I wanted to see how far I could go and it did crack a bit past 90. The other blade was also run through the test cutting the rope 3 times and the 2x4 3 times. I of course did not do the bend, but rather resharpened the edge for the official test.
Over the past years, I have picked up a lot of knowledge at hammer ins, knife shows, knife forums, etc that all combined and adjusted for the tools and such that I have, helped guide me through this test. A big thanks goes out to everyone in the above mentioned areas (too many to list) that had a part in guiding me down this path.
Thanks again
Brian
The first blade I made cut like a dream, but cracked half way on the bend when I got to about 75 degrees. The next one cut great as well, but cracked at about the same angle, but only about 1/3 of the way. After each test, I bent the blades back and forth until I broke them apart and examined under magnification what was going on and made adjustemnts for the next blade. The next blade did well in each part of the test and cracked just a bit right around 90 degrees so I knew I was close. I then forged 2 blades very close to the same and from the same billet. I heat treated them exactly the same and ran one of them through the test. It did very well and did not crack at 90 degrees, but I wanted to see how far I could go and it did crack a bit past 90. The other blade was also run through the test cutting the rope 3 times and the 2x4 3 times. I of course did not do the bend, but rather resharpened the edge for the official test.
That sounds like a smart way of doing things! Congratulations on a well laid plan that paid off in the end.
Brian, that's a good answer to my question. It's interesting to me just what the thought process is that leads to an actual plan. I feel that so many fail to take in consideration all of the many variables that lead to ones passing of the test. You did just right.
One thing that would help successfully pass the flex test and is often overlooked is distal taper. Proper distal taper combined with even heat treatment along the entire blade will distribute the flex throughout the whole length, increasing the predictability of success. Like yours, it's possible to flex it 90 degrees and it not take much set. Lin
You are right about the thought process Lin.
I think that part of the design of the test is to get bladesmiths to think ( not just do) outside their normal comfort zone and really put their knowledge to the test as well as their skill. There are so many factors that you have to think about and come up with a proper balance to get the blade to pass. This is true for both the JS and MS test blades.
Also placing a lot of thought into the process saves time in the end. This is also true for both the JS and MS test blades but the MS blade has to be Damascus so it takes much more time to do. Putting thought into what is happening with your blade when it fails and what you need to do to correct that is also a great learning tool.
As the old saying goes, you can learn more from your failures than your successes.
Brian
