Hey Everyone
I'm going to do my performance test the end of this month. I made 2 blades and just tested the one I liked less. Passed the rope & 2x4 part no problems. When I did the bend test I thought I heard a "ting" right about 90'. It returned to about 10 degrees to true with the handle having about another 5 degree bend. Inspected the blade, didn't see any damage, and decided bend it again. Put the blade back in vice the other way, put the pipe back on, and started bending back toward me. At about 75 or so degrees it broke near the handle around where the pipe was at (2" pipe if that matters. Handle width was 1 1/4").
On one hand- it survived the first bend. On the other I don't know why it would break up there on the second. So of course I'm slightly freaked out
5160 steel. Heat treating method after grinding: Normalized twice- 1400 first time, 1350 2nd. Heated to 1525 & edge quenched in 120' canola oil about 1/3 of the blade width. Tempered at 375 for 2 hours. Flat ground to 220 grit then sharpened on slack belt to 2000 grit belt.
Attaching pics. Any thoughts?
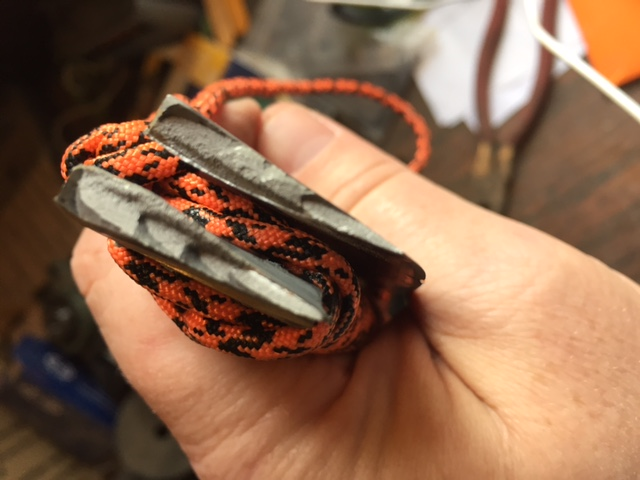
Break Point
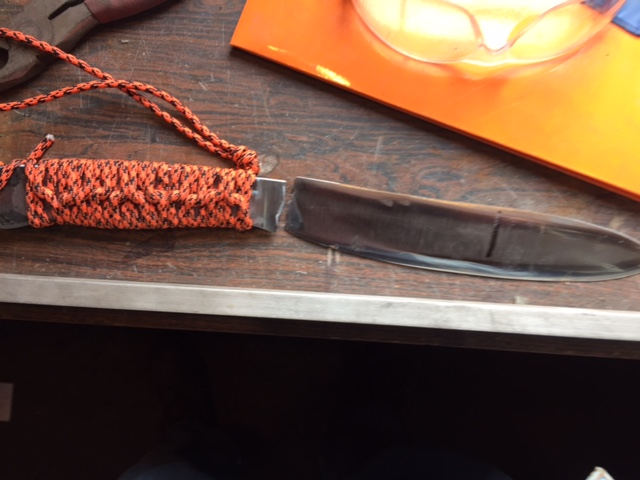
whole blade. The black line 3" from the tip was where it went into the vice.
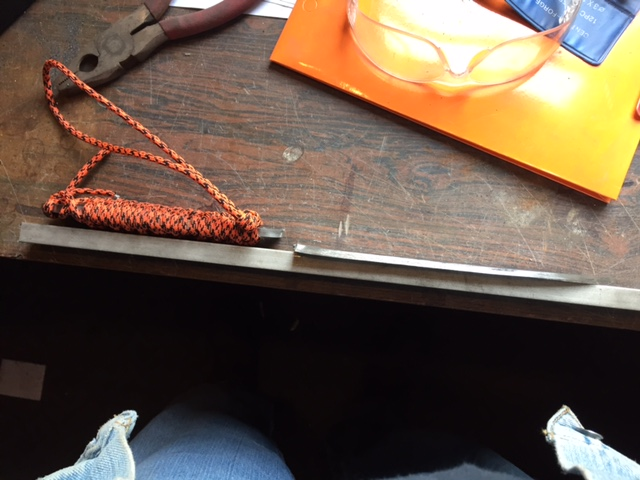
top view
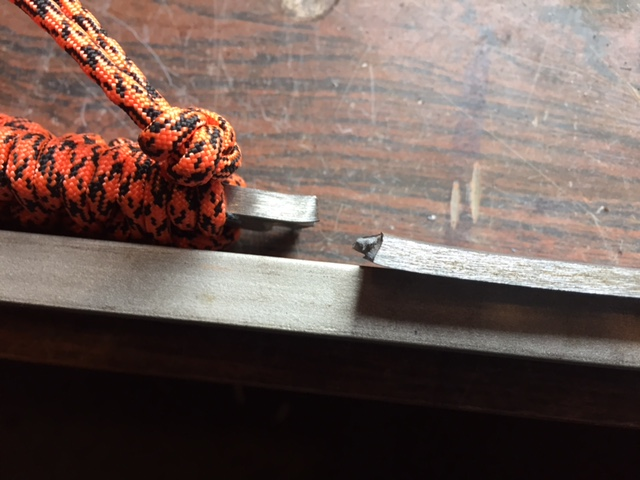
tighter view of top of break point
nick in edge near break. It wasn't in there when I started the second bend
Thanks for looking
Dave, I see from the photos three things that most likely contributes to it breaking/bending where it did.
There's not much distal taper in the blade, if any. Distal taper serves much more than to balance the knife.
The cross scratches on the blade. I can only assume some of these reached the edge and created a stress riser.
The profile and grind creates a waist right at the breaking point. It seems you actually designed it to break right where it did.
While this seems presumptuous on my part, I really think that is what happened. I'm trying to be direct and to the point since you are short on time.
I'll be glad to elaborate if you want.
Lin- please do
I chose this one as the "trial" one because it didn't have much of a taper. The other one is a touch thinner but has a more pronounced distal taper. As for the scratches- it is a quick & dirty belt finish. My test blade is going to get hand rubbed to 600 grit. Profile wise I wanted to have the widest part of the blade in the middle where I would do the majority of chopping and wanted to avoid any sudden transitions. So I went with a more sweeping curve.
What threw me is where it broke. When I've tested to destruction before the break is usually in the tip- middle sections. It was one of those moments where I was somewhere between "Huh" and UH OH".
The reason I tested it now was because my next couple weekends are nuts. I didn't want to find a problem a with only a couple days to fix it. The other blade handled the rope and 2x4 with no problems, so I'm going to kill the edge, polish, and resharpen.
Thanks
Dave I am curious how long the overall knife is and the length of the blade from plunge line to the tip.
At the ABS class I took we were taught to use an acetylene torch to further draw back the knife. I know you did an edge quench but 1/3 width may not be low enough.
Hello Dave. Like Lin said, not much distal taper on that one. Distal taper will spread the force of the bend across a larger area. That tink you heard was probably an initial crack starting at the handle blade junction. One thing I noticed is your normalizing temps. I would recommend upping those to 1600 first cycle, then 1500 for the second. Also did you draw the spine and ricasso-tang area? If so did you use an O/A torch or propane? You have to be careful with an O/A torch and 5160. If you get it too hot 5160 can air harden in small areas. Just some thoughts. The grain does not look super big.
Brion
Brion Tomberlin
Anvil Top Custom Knives
ABS Mastersmith
Brian brought a really good point in that I have seen so many folks that use a torch setup for heat treating always, heat the ricasso exactly there to prevent the handle or tang from acting as a heat sink. It naturally gets much more than it's share of grain enlarging heat, and with 5160 and it chromium content, you will get air hardening. I've also seen some use tongs or vise grips to grasp the heated blade right there to control the edge for edge quenching and this can too quick draw from that area. Just a thought. Looking at the photo of the cross section of the break it almost looks like the edge was ground beveled more to one side,which could be an illusion to my eyes. You might also consider bumping up your tempering temp 10 to 15 degrees to stop the edge chipping.
Scott- it had an 8" blade, 14" overall. The other knife has the same length/ shape, but I'm going to take an inch off the butt before I finish it.
Brion & Wes- I didn't draw the spine with a torch. The only torch I have in the shop is a map bottle torch I use as a burner for a 1 brick forge and brazing all thread onto tangs. I could do it with that torch. I just don't do it that often. They were heated in my Evenheat oven and tempered in a toaster oven with a couple thermometers. Do you think I should redo the whole HT cycle or just do another tempering cycle at 385/390 instead of 375?
Thanks
Dave, As brought out in each of the above replies by other smiths, it could be a sum total of several things that has lead to the resulting behavior of that blade. Any one of them by itself can make a difference. Some more or less than another. But when you add them up, you get a predictable results. That is what this kind of testing is for. We have to study the failures as much as the successes. This will give us insight into why the it behaved this way.
You said:
Profile wise I wanted to have the widest part of the blade in the middle where I would do the majority of chopping and wanted to avoid any sudden transitions. So I went with a more sweeping curve.<br />
While I can understand your reasoning, I think it is faulty in this case. Chopping is only part of this particular knife's required performance duties. In fact you are under no time crunch to chop the 2 X 4's. I feel I must point out just how important over all blade taper and geometry of profile is to a performance test knife. In fact it is every bit as important as the heat treat and the actual edge geometry.
I am specifically isolating the place where your blade broke. Lets face it, it was either too brittle, or weaker than the areas on either side. Now you must determine what caused it. Remember, if you're going to soften that area and ask it not to bend, you have to leave it a bit thicker, and in your case, wider. After all, the areas in front of it are harder, thus stiffer. The fact that it broke at all might also indicate a heat treat issue. It could be a simple oversight in technique as mentioned above in the other posts. This test will make it necessary for you to weed out poor technique and give due attention to detail.
5160 is used in test blades very often. I officiated a performance test yesterday for Allen Newberry. He passed with flying colors using 5160 steel. His blade was textbook in taper, geometry and heat treat.
Thanks Lin


